


Bready or Not: Gingerbread Cookie Cheesecake Bars
If you love both gingerbread cookies and cheesecake, oh boy, do I have the recipe for you. These Gingerbread Cookie Cheesecake Bars are dense, rich, and outright divine.
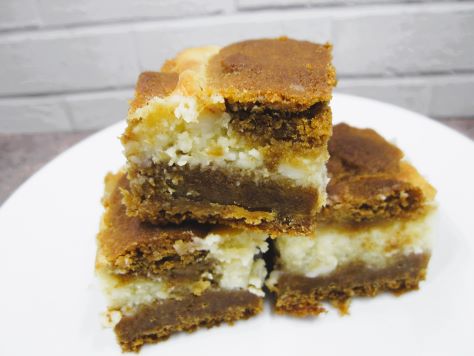
The creation process also dirties a lot of dishes, but hey, sometimes that’s what is required to make something that truly comes across as special. This recipe makes a 9×13 pan of thick bars, so bake this to feed a crowd!

Modified from Holiday Cookies magazine 2019.

Bready or Not: Gingerbread Cookie Cheesecake Bars
Equipment
- 9×13 pan
- aluminum foil
- nonstick spray
- uneven spatula
Ingredients
Gingerbread
- 1 1/2 cups unsalted butter (3 sticks) softened
- 1 1/4 cups white sugar
- 3/4 cup brown sugar packed
- 1/2 cup molasses
- 2 large eggs room temperature
- 4 cups all-purpose flour
- 2 teaspoons ground cinnamon
- 2 teaspoons ground ginger
- 1 1/2 teaspoons kosher salt
- 1 teaspoon baking powder
- 1 teaspoon baking soda
- 1/4 teaspoon nutmeg
- 1/8 teaspoon allspice
- 1/8 teaspoon cloves
- 3 Tablespoons minced candied ginger
Cheesecake
- 16 ounces cream cheese (2 blocks) softened
- 1 cup white sugar
- 1 Tablespoon all-purpose flour
- 2 large eggs room temperature
- 1 Tablespoon vanilla extract
Instructions
- Preheat oven at 350 degrees. Line a 13×9-inch pan with aluminum foil. Apply nonstick spray.
- In a large bowl, beat the butter and sugars until fluffy. Add the molasses, mixing until no streaks remain. Add eggs, one at a time, scraping the bottom of the bowl on occasion.
- In a separate bowl, combine the flour, cinnamon, ground ginger, salt, baking powder, baking soda, nutmeg, allspice, and cloves. Gradually add the dry ingredients to the wet. Fold in the candied ginger.
- Measure out 2 cups of the dough and set it aside.
- Press the remainder of the dough into the pan, forming an even layer.
- Time to make the cheesecake layer. Beat the cream cheese until creamy. Add the sugar and flour. Add the eggs one at a time, followed by the vanilla. The mixture should be fairly consistent in color and texture, but it’s okay if there are some small lumps.
- Use an uneven spatula to spread the cheesecake into an even layer. Crumble the reserved topping over it.
- Bake for 50 to 60 minutes; the middle should not look jiggly and should pass the toothpick test. If the top is browning too much, cover with foil.
- Cool at room temperature for about an hour, then place in fridge to completely chill for a few hours. Use foil to lift onto cutting board to slice into small pieces. Store in fridge in a sealed container.
OM NOM NOM!
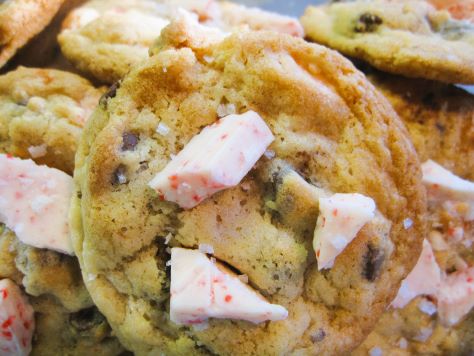
Bready or Not Original: Chewy Honey Peppermint Bark Cookies
I’ve shared a sequence of Peppermint Bark Cookies, but this one is my favorite: Chewy Honey Peppermint Bark Cookies.

The base “Chewy Honey” recipe here will be a familiar one to regulars on Bready or Not–or if you’ve met me at a convention at some point in about the past 10 years and had my Maple or Snickerdoodle versions. This new version is modified to incorporate lots of chopped peppermint bark candy.

As with the similar recipes, the quality of the peppermint bark will not only make a difference in taste but also the prettiness.

As with the other recipes in my “Chewy Honey” collection, these baked cookies will keep for weeks in a sealed container. That makes them great to mail as a holiday gift, but of course, be wary if you’re sending them to or from a warm destination. In an infernal place like Arizona (which I am so glad to be away from), it can still be hot, even into December!
Bready or Not Original: Chewy Honey Peppermint Bark Cookies
Equipment
- cookie scoop or spoon
- parchment paper
Ingredients
- 3/4 cup unsalted butter softened
- 1/2 cup light brown sugar packed
- 1/2 cup white sugar
- 2 Tablespoons honey
- 1 large egg room temperature
- 1 Tablespoon vanilla extract
- 1/2 teaspoon peppermint extract
- 1 cup bread flour
- 1 cup all-purpose flour
- 2 teaspoons cornstarch
- 1 teaspoon baking soda
- 1/2 teaspoon salt
- 1 1/2 cups peppermint bark chopped
- more peppermint bark pieces for topping
Instructions
- In a large bowl, beat butter until smooth. Add both sugars and honey; beat until creamy and fluffy. Scrape down sides of bowl, then mix in the egg and both extracts.
- In a separate bowl, combine the dry ingredients: bread flour, all-purpose flour, cornstarch, baking soda, and salt. Sift together.
- Slowly stir together the wet ingredients and flour mix until just combined. Fold in the peppermint bark. Encase dough in plastic wrap and stash in the fridge for several hours or days; dough can also be frozen at this stage.
- When ready to bake, preheat the oven at 350 degrees. Place parchment paper on cookie sheet. Use a teaspoon or tablespoon to space out cookies on the pan. Press additional peppermint bark pieces into the tops of the dough balls.
- Small cookies bake 9 to 12 minutes; larger cookies bake in 11 to 13 minutes. Once removed from the oven, let set on baking sheet for about 10 minutes before transferring to a rack to cool completely.
- Stored cookies will keep in a sealed container for weeks. They are excellent for travel or shipping.
OM NOM NOM!
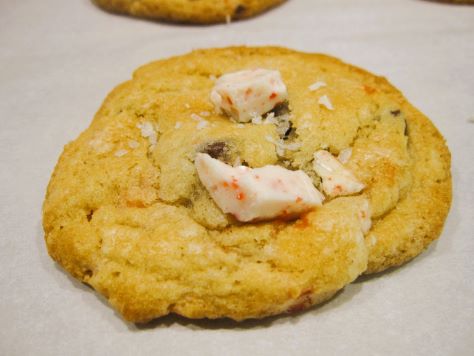
Bready or Not Original: White Chocolate-Peppermint Bark Cookies
Last week, I posted a Peppermint Bark Cookies recipe modified from Bake from Scratch Magazine. This week, I share a reworked version of the White Chocolate Macadamia Nut Cookies I’ve made for about two decades. This White Chocolate-Peppermint Bark Cookies recipe includes white chocolate melted into the dough, resulting in a smooth, sweet cookie that gets only better with the addition of peppermint bark.

A whole bag of white chocolate chips is included in this recipe. A cup is melted for the dough; the rest is added as chips, right along with the coarsely chopped peppermint bark.

These cookies are incredible. I preferred them over last week’s take, though both are excellent.

Modified from Bready or Not: White Chocolate Macadamia Nut Cookies.
Bready or Not Original: White Chocolate-Peppermint Bark Cookies
Equipment
- microwave-safe small bowl
- cookie scoop or spoon
Ingredients
- 10 ounces white chocolate chips divided
- 2/3 cup white sugar
- 11 Tablespoons unsalted butter room temperature
- 1 teaspoon vanilla extract
- 1/2 teaspoon peppermint extract
- 2 large eggs room temperature
- 2 1/2 cups all-purpose flour
- 1 teaspoon baking soda
- 1 teaspoon cream of tartar
- 2 cups peppermint bark coarsely chopped, divided (about 12 ounces)
Instructions
- Preheat oven to 325 degrees. Place 1 cup of white chocolate chips in a microwave safe bowl. Microwave on 50% power in short increments, 20-25 seconds, and stop to stir between passes until the chips blend smoothly; take care, as it can burn fast! Set aside to cool.
- In a large mixing bowl, beat together the sugar, butter, vanilla, and eggs until they are creamy. Mix in the melted chips. Stir in flour, baking soda, and cream of tartar. Fold in the remaining chips and 1 cup of peppermint bark.
- Use a tablespoon cookie scoop or spoon to place dough in rounded lumps on cookie sheet. Using the reserved stash of peppermint bark, press a few pieces onto the top of each dough ball. Bake 10 to 12 minutes, until the tops just begin to turn light golden brown. Immediately add a few more pieces of peppermint bark onto the top of each cookie. Cool on the sheet for several minutes, then move to a rack to set for about 3 hours; this process can be speeded up by briefly placing cookies in the fridge.
- Store in a sealed container at room temperature. Best eaten within 5 days.
OM NOM NOM!
Bready or Not: Peppermint Bark Cookies
This Peppermint Bark Cookies recipe, modified from a holiday Bake from Scratch issue, is the first in a small series of such experiments.
One thing I’ll say straight up: peppermint bark can be expensive, and this recipe will look much prettier with nicer bark. I used cheap Palmer Peppermint Bark from Dollar Tree for this recipe, and it doesn’t look as nice as my other experiments.
That said, the cheap stuff can still make tasty cookies. These morsels are soft, chewy, and loaded with chocolate and peppermint flavor. They make for a great holiday treat. If you want to make them year-round, stock up on peppermint bark while you can get it–if you’re lucky, score some on clearance right after Christmas.

Bready or Not: Peppermint Bark Cookies
Equipment
- plastic wrap
- parchment paper
- large cookie scoop
Ingredients
- 1 cup unsalted butter (2 sticks) softened
- 3/4 cup white sugar
- 3/4 cup brown sugar packed
- 2 large eggs room temperature
- 2 teaspoons vanilla extract
- 2 3/4 cups all-purpose flour
- 1 teaspoon baking powder
- 1 teaspoon kosher salt
- 3/4 teaspoon baking soda
- 10 ounces peppermint bark chopped, divided
- 1 cup semisweet chocolate chips
- flaked sea salt for topping optional
Instructions
- In a large bowl, beat together butter and sugars until they are light and fluffy. Add the eggs one at a time, followed by the vanilla.
- In another bowl, combined the flour, baking powder, kosher salt, and baking soda. Gradually add the dry ingredients into the wet, beating until just combined. Measure out 1 cup of the peppermint bark and add that to the dough, folding it in. Add the chocolate chips and fold in.
- Wrap dough in plastic wrap and stash in the fridge for at least 2 hours, or up to 3 days.
- Preheat oven at 375 degrees. Place parchment paper on a baking sheet.
- Use cookie scoop to dole out dough, spaced out, on cookie sheet.
- Bake for 10 to 12 minutes, until cookies are set and turning golden brown. Immediately press a piece or two of the reserved peppermint bark onto each round. Add a small pinch of flaked sea salt to each, if desired. Let set until bark pieces solidify, then transfer to a cooling rack.
- Store cookies in a sealed container up to 4 days.
