


Book Blog: A Master of Djinn(Dead Djinn Universe #1) by P. Djèlí Clark
I review everything I read and post reviews on Goodreads and LibraryThing. That’s not enough. Good books are meant to be shared. Therefore, I’m spotlighting some of my favorite reads here on my site.

A Master of Djinn (Dead Djinn Universe #1) by P. Djèlí Clark
out now in print and ebook; BookShop, B&N, and Amazon [affiliate link]
I received a galley of this book via NetGalley.
P. Djèlí Clark is one of the best historical fantasy authors out there right now, and his debut novel proves it yet again. I’ve enjoyed his novellas set in this same magical, steampunk-tinged Cairo as well as his Nebula-nominated Ring Shout, but this novel is even better because it delves deeper into the setting, into the characters.
The set-up of the book uses the formula of most mystery novels: it begins by showing a murder, though the victim’s perspective. It then switches to the investigation. Fatma is a dapperly-dressed woman, one of few who work within the Ministry of Alchemy, Enchantments and Supernatural Entities. She’s called to the scene of a disturbing mass murder that reeks of magic, and soon encounters something she finds even more disturbing: she has been assigned an enthusiastic new partner. The gruff detective wants no part of this arrangement, but together they start an investigation that abounds in dark magic, conniving angels, and powers no human should command.
The book doesn’t shy away from the horrors of colonialism, homophobia, and racism. The world feels realistic, even filled as it is by djinn and spirits and old gods reborn. Fatma is a fantastic heroine–a rare lesbian lead character. She’s smart, impeccably-dressed, and I couldn’t help but root for her from the very start. The plot of the book has many twists and turns, and while I predicted the identity of the Master of Djinn early on, that didn’t spoil my enjoyment one bit.
I hope there are many, many more books set to come in this world.
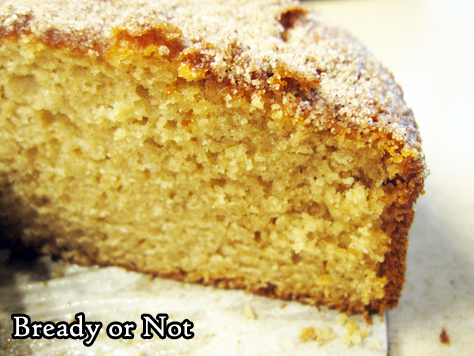
Read MoreBready or Not Original: Vanilla Applesauce Cake
Some days call for a no-fuss apple cake. This Vanilla Applesauce Cake is for those kinds of days.
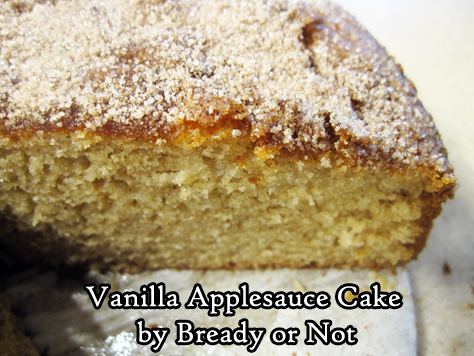
There is no need to worry about procuring apples, or having them go bad, or the effort to peel and slice them. This cake uses applesauce, which loads the cake with beautiful flavor.
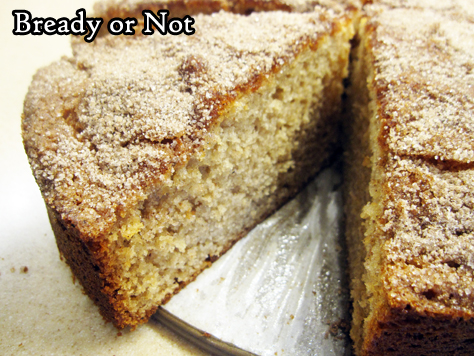
The cake also has the gentle flavor of a great combination of spices. The finisher is no-fuss, too: a top crusted with coarse sugar that adds a touch more sweet and a tiny crunch.
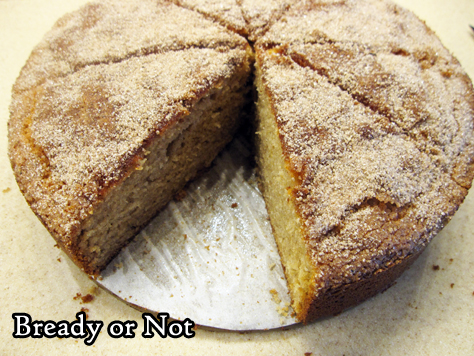
Want to serve this cake for just a few people? No problem. Slice up the cake, and freeze individual slices for later.
Modified greatly from a Heilala Vanilla ad in Bake from Scratch Magazine, September/October 2019.
Bready or Not Original: Vanilla Applesauce Cake
Equipment
- 9-inch springform pan
- offset spatula
- parchment paper
Ingredients
- 2 cups all-purpose flour
- 2 teaspoons baking powder
- 2 teaspoons ground cinnamon
- 1 teaspoon kosher salt
- 1/2 teaspoon baking soda
- 1/2 teaspoon ground ginger
- 1/4 teaspoon ground cloves
- 1 cup white sugar
- 1 cup applesauce or about 2 individual serving cups of applesauce
- 1/2 cup buttermilk or soured milk (see note)
- 1/2 cup vegetable oil
- 2 large eggs room temperature
- 1 teaspoon vanilla extract
- 1/4 cup coarse sugar as topping, such as turbinado, maple, etc
Instructions
- Preheat oven at 350-degrees. Cut parchment paper to fit in the base of a 9-inch springform pan. Apply nonstick spray with flour to bottom and sides of pan. Add parchment and spray again. Set aside.
- In a big bowl, combine flour, baking powder, cinnamon, salt, baking soda, ginger, and cloves.
- In another bowl, whisk together the sugar, applesauce, buttermilk or soured milk, oil, eggs, and vanilla. Gradually pour the wet ingredients into the dry, mixing well.
- Pour batter into the pan and smooth out with an uneven spatula. There will likely be bubbles in the batter. Gently tap the sides of the pan and thump it on the counter to get them to rise and burst. Using a spoon, sprinkle the coarse sugar all over the top as evenly as possible.
- Bake for 35 to 40 minutes, until the middle passes the toothpick test. Let cool in pan for 10 minutes, then release sides. Let cake cool completely on base for several hours.
- Slice into wedges and serve. Cake keeps well in a sealed container at room temperature and pieces can also be wrapped individually and frozen for later enjoyment.
OM NOM NOM!
Notes
Beth Cato: Now on Wikipedia
I recently discovered that someone spent incredible time and effort to create a Wikipedia page about me. It’s quite comprehensive. The information is culled from my bibliography page here on my site as well as other resources.
I can’t say I mind–I’m more baffled than anything because of the effort involved. Thanks, stranger!
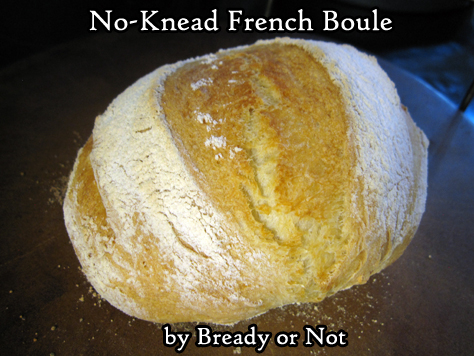
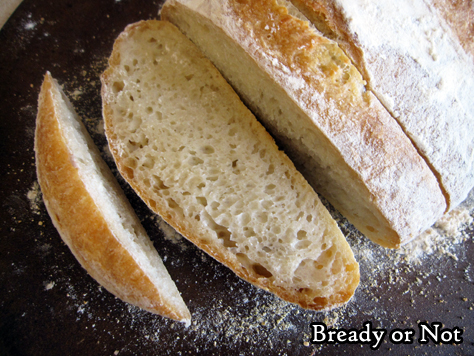
Read MoreBready or Not: No-Knead French Boule (French Bread Round)
French bread is one of the best things in the world and it is super-easy to make. All you need are four ingredients and some time.
The time element is not that much of an issue, though, because this takes all of five minutes to mix up. After an initial rise, the dough can then be tucked away in the fridge for up to two weeks.
If this technique looks familiar, it’s because it’s similar to the recipe I shared in February for my favorite pizza dough. They are both modified from the book Artisan Bread in Five Minutes a Day.
The boule, or bread round, is the most traditional form of French bread. The baguette is actually an innovation from the 1920s. The boule was first, and is, arguably, the best.
This bread is perfect to slice up, butter, and toast. It’s great for sandwiches. For charcuterie and cheese. To make French toast. Any way you can eat bread, really.
It’s also great to freeze and thaw for later enjoyment! This is really a recipe that is all about convenience, before and after baking.
Bready or Not: No-Knead French Boule (French Bread Round)
Equipment
- baking stone or baking steel
- small metal cake or casserole pan
Ingredients
- 1 1/2 cups lukewarm water
- 2 1/4 teaspoons active yeast or one store packet
- 3 1/4 cups all-purpose flour
- 2 1/4 teaspoons kosher salt
Instructions
- Warm the water to just above body heat, about 100-degrees. Pour it into a large bowl. Add the yeast, flour, and salt. Stir until everything is uniformly moist, no dry patches to be found.
- Loosely cover the bowl with plastic wrap, waxed paper, or an off-kilter lid, and set in a warm spot in the kitchen.
- After about 2 hours, it should double in size and flatten out on the top; a colder kitchen may need as long as 5 hours, which is fine.
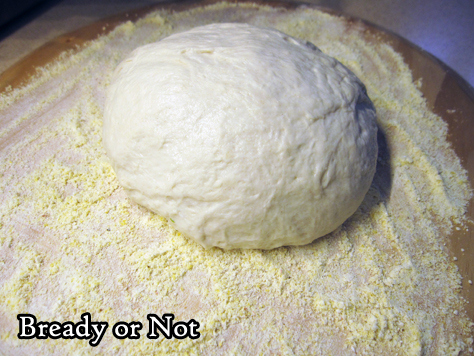
- The dough can be used now, but is very sticky. It's easier to work with if it has chilled in the fridge for at least 2 hours, but can idle in there overnight or for as long as 2 weeks. Keep loosely covered so that it doesn't dry out.
- Prepare a piece of parchment with a dusting or flour, semolina, or fine cornmeal. To shape the dough into a round, dust hands with flour then gently shape dough into a ball, tucking and smoothing rough bits into what will become the bottom. Set dough on prepared parchment. Let rise for 20 to 30 minutes. It may not rise a lot, but should puff a bit.
- Start preheating oven at 450-degrees. Place baking stone or steel in the middle rack of the oven. Place the empty metal cake or casserole pan beneath it. Let the oven heat for 20 minutes.
- Measure out 1 cup of water.
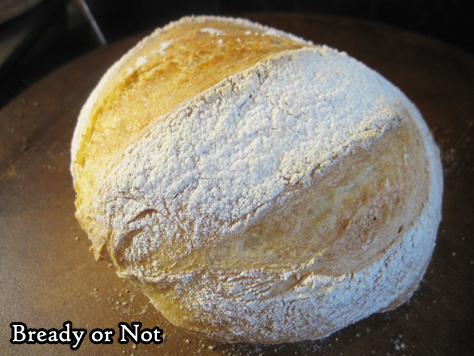
- After the bread has risen for about 40 minutes, lightly dust the top of the dough with flour. Use a lame or serrated knife to slash lines across the top.
- Pull the hot stone or steel from the oven. Use the parchment to carefully transfer the dough onto the hot surface. Set baking sheet into oven. Pull out the heated pan on the shelf below. With care, pour the water into the pan; do not overfill! Gingerly push the shelf back into place and close the oven so that the steaming water can work its magic on the baking bread.
- Bake for about 30 minutes. Do NOT open the oven until the end of that time! The bread should look crusty and golden over the top. Pull out the pan and let the bread cool. It may emit a crackling sound as it cools down. If the bottom is carefully thumped, the bread should sound hollow.
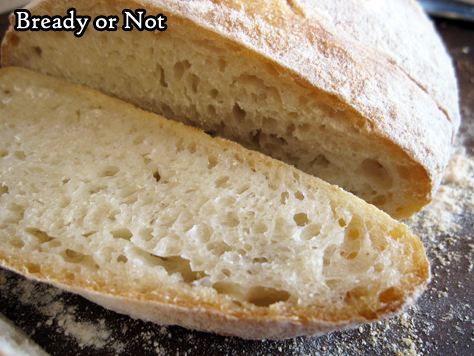
- Let cool about 20 or 30 minutes before cutting into the bowl. Store in a sealed bag for up to 2 days. If freezing portions of the bread, do so within the first day so they will be as fresh as possible.
OM NOM NOM!
Follow me


