


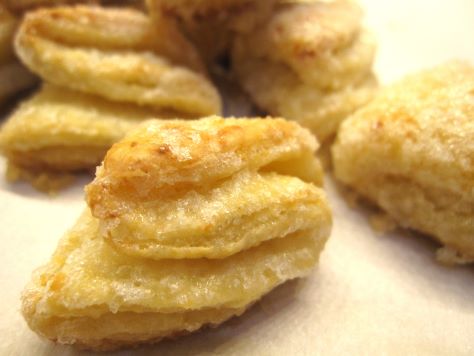
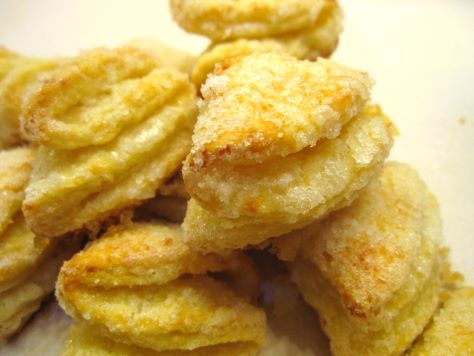
Bready or Not: Farmer’s Cheese Cookies
These Farmer’s Cheese Cookies don’t taste cheesy as one would expect in a gooey, cheese-pull kind of way. Instead, the cheese here adds a touch of savory flavor and a lot of light, chewy texture.
Cookies like this are traditional in Ukraine and Russia. I found a nice block of Ukrainian Tvorog Farmer’s Cheese at Lee Lee Grocery on 75th Ave in Phoenix; check your own local import markets for similar cheese.
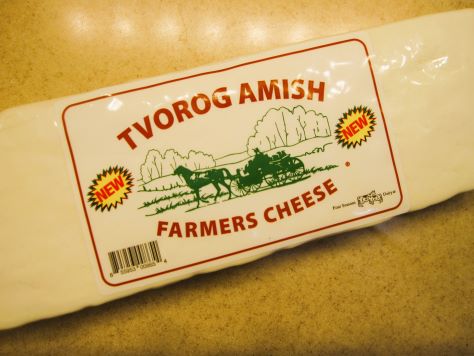
Expect a dry, crumbly texture in the cheese. Mine became somewhat powdery as I broke it down, which was fine. I was able to incorporate everything with an extra touch of water, which is a pretty common thing for me to do with roll-out cookies in Phoenix. It’s very dry here compared to most other places.

The end result is a cookie that, quite honestly, tastes fancy–light, crisp, sugary, like something that one would find in a fine bakery. Most people wouldn’t guess there’s cheese in the dough, I bet, but they’ll know there’s something different about them. Something delicious.
Bready or Not: Farmer’s Cheese Cookies
Equipment
- grater or food processor
- pastry blender
- 3-inch round cutter or the top of a glass
- parchment paper
- saucer or bowl
- Rolling Pin
Ingredients
- 1 cup unsalted butter 2 sticks, chilled
- 8 oz farmer's cheese such as Ukrainian Tvorog cheese
- 2 cups all-purpose flour
- 2 egg yolks
- 2-3 Tablespoons water
- 1 1/2 cups white sugar
Instructions
- Grate the butter using a hand grater or a grater attachment on a food processor. In a large bowl, use a pastry blender to cut in the cheese, which will be crumbly. Add the flour, followed by the yolks and water. Knead the dough until it comes together in a cohesive mass.
- Form the dough into a disc and encase it in plastic wrap to chill for anywhere from an hour to several days.
- When it’s cookie time, preheat oven at 375-degrees. Line a large baking sheet with parchment paper. Place a small amount of water in a saucer or bowl. Measure the white sugar into a deep bowl.
- Prepare a clean work surface with a dusting of flour. Break off some of the dough and roll it into a thin layer, like for a pie crust. Use the cutter to slice out 3-inch rounds; place the leftover and unused dough to chill in the fridge while cookies are shaped.
- Dampen fingers in the prepared water. Brush wet fingers over one side of a dough round. Dip moist dough into the sugar to coat it. Fold in half with the sugared portion on the inside. Dampen fingers and stroke another folded side of the dough, and dip that in sugar. Fold a final time with the sugared section on the inside. Use wet fingers on outside of cookie and coat that in sugar, too. Gently press the pleats together to prevent them from unfolding during baking. Place formed cookie on sheet and repeat process with remaining rounds.
- Bring together dough scraps, using a little water if needed, to roll out again. Use rest of dough to form cookies.
- Bake in batches for 19 to 22 minutes, until puffed and set with a golden base. Store in a sealed container at room temperature.
OM NOM NOM!
Bready or Not Original: Chicken and Rice Soup
Chicken and Rice Soup is the ultimate classic, home-cooking, feel-better-soon kind of meal. I’m stunned I haven’t featured it on Bready or Not before, but here it is now: my take on the old favorite.
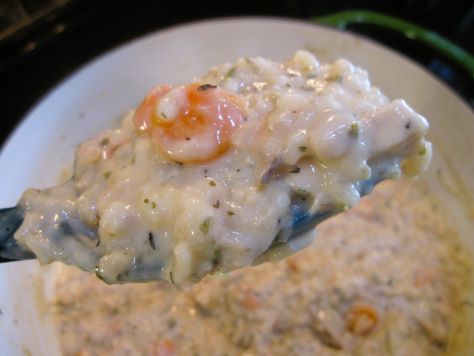
I’ve tweaked this over the years to get the balance of liquids and seasonings just right. I make this a couple times a year. It’s my stand-by if my husband is sick–it’s hearty, hot, sits well in the stomach, and the sheer amount made means the leftovers can last for days (which is nice if I come down sick next, too).

Bready or Not Original: Chicken and Rice Soup
Equipment
- stock pot or other large pot with lid
Ingredients
- 1 cup baby carrots chopped
- 2 Tablespoons dried celery flakes
- 1 Tablespoon dried onion flakes
- 1 teaspoon garlic powder
- 64 oz reduced sodium chicken broth 2 boxes or 4 cans
- 3 Tablespoons flour
- 1/2 cup short grain white rice such as sushi rice
- 1 teaspoon dried thyme
- 1 teaspoon dried rosemary or 1 freshly-cut sprig
- 2 bay leaves
- 2 to 3 cups shredded rotisserie chicken or cooked turkey
- 1 1/2 cups half & half
Instructions
- Place carrots, celery flakes, dried onion, and garlic powder in a large pot along with 1 can of chicken broth (if using a box of broth, just pour in about 1/2 of one; no need to be exact). Sauté on medium heat for 10 minutes, until carrots are tender. Sprinkle in flour and stir for another few minutes.
- Add rest of broth along with the rice, thyme, rosemary, and bay leaf. Bring pot to boil.
- Reduce heat to medium-low and cover pot. Cook for 25 to 30 minutes. When the rice is tender, add the chicken or turkey. Cook for 10 minutes. Stir in half & half and cook for another 10 minutes.
- Remove both bay leaves. Add salt and pepper to preference. Serve hot. Leftovers can keep in the fridge or days or can be frozen.
OM NOM NOM!
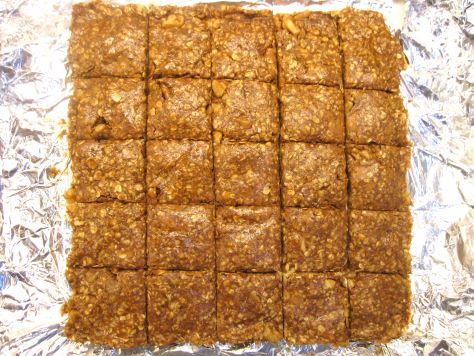
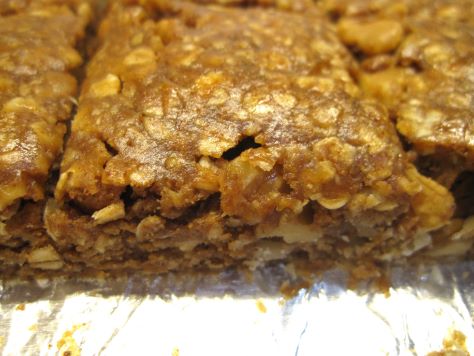
Bready or Not Original: No-Bake Almond Granola Bars
These No-Bake Almond Granola Bars are fast to make and contain wholesome, basic ingredients. Plus, they are delicious.
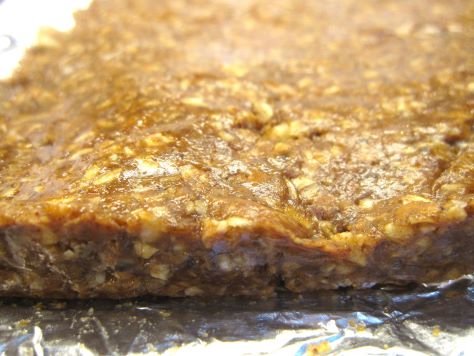
I made this recipe several times to find the right balance of ingredients. Too many almonds and oats, and nothing sticks together. You think it’s solid until you try to cut the chilled bars. (I speak from experience.)
I find it fun to make little swaps with the ingredients, too. Use cashew butter or another kind of nut butter! Try different varieties of honey. You could even use pumpkin spice mix or other spices to give it a different vibe.
The end result will keep for a week or two in the fridge, and even longer in the freezer!
Bready or Not Original: No-Bake Almond Granola Bars
Equipment
- 9×9 pan
- aluminum foil
- nonstick spray
- food processor
- waxed paper
- heavy glass
Ingredients
- 1 cups almonds or buy pre-chopped almonds
- 2 cups quick-cooking oats
- 2 teaspoons ground cinnamon
- 1/2 teaspoon fine sea salt reduce if using regular table salt or salted nut butter
- 1 1/2 cups creamy almond butter
- 1/2 cup maple syrup or honey
- 2 teaspoons vanilla extract
Instructions
- Line a 9×9 square pan with foil and apply nonstick spray.
- If the almonds are whole, give them a rough chop in food processor, just a few pulses.
- In a large mixing bowl, combine the oats, cinnamon, and salt, and stir to blend. If the almond butter is stiff, measure it into a separate microwave-safe bowl and heat it for 20-30 seconds to soften it. Add almond butter, maple syrup or honey, and vanilla extract to the big bowl with the dry ingredients. Stir together until it forms a cohesive mass. If it seems too liquid, add more oats; if it’s too dry, add more almond butter. Stir in the chopped almonds to distribute them throughout.
- Dump the mixture into the prepared pan. Even out some, then use a pan-size piece of wax paper and a heavy glass to compress the dough evenly.
- Stash the pan in the fridge for at least an hour, or until the next day. Slice into bars of desired size. Store between stacked waxed paper layers in the fridge, or freeze for later enjoyment.
OM NOM NOM!
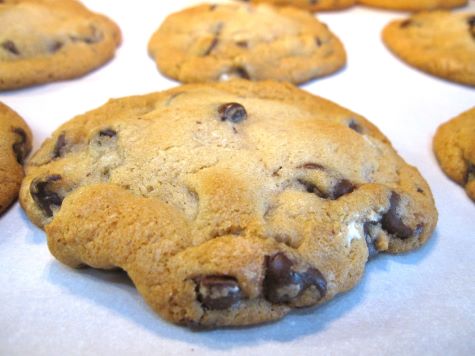
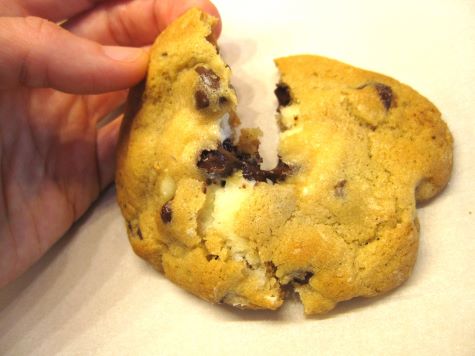
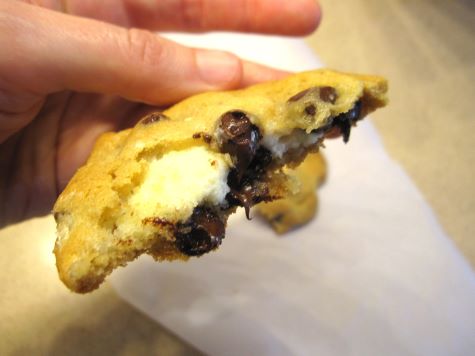
Bready or Not: Cheesecake-Stuffed Chocolate Chip Cookies
These Cheesecake-Stuffed Chocolate Cookies are big, rich, and incredible. You get a core of cream cheese surrounded by chocolate-laden dough. I mean, come on.
For this recipe, you need to make the dough and filling in advance. I made them a day ahead, but you want at least a few hours of refrigeration time. You also chill the cookie dough right after it’s shaped. That means you need some empty room in the fridge for doing this recipe.
This is also a recipe where you really do need a tablespoon and teaspoon scoop to produce even cookies. That, or you just naturally have a good eye for estimating such things.
Modified from Allrecipes Magazine Feb/March 2022.
Bready or Not: Cheesecake-Stuffed Chocolate Chip Cookies
Equipment
- tablespoon and teaspoon scoops
- fridge space
- parchment paper
Ingredients
Filling
- 8 ounces cream cheese room temperature
- 1/2 cup confectioners’ sugar
Cookie Dough
- 3/4 cup unsalted butter (1 and a half sticks) room temperature
- 3/4 cup white sugar
- 3/4 cup brown sugar packed
- 2 large eggs room temperature
- 2 teaspoons vanilla extract
- 2 1/4 cups plus 2 Tablespoons all-purpose flour
- 1 teaspoon baking soda
- 3/4 teaspoon salt
- 12 ounces chocolate chips
Instructions
Make the filling
- Beat together the cream cheese and confectioners' sugar to make a smooth mixture with few if any lumps. Stash it in the fridge to chill for a few hours or overnight.
Make the cookie dough
- Beat together the butter and both sugars until they are creamy. Add the eggs and vanilla.
- In a separate bowl, combine flour, baking soda, and salt. Gradually pour this into the butter mixture, scraping the bottom of the bowl to make certain everything is combined. Fold in the chocolate chips. Chill the dough in the fridge for a few hours or overnight.
Baking the cookies
- Preheat oven at 350-degrees. Line a large baking sheet with parchment paper. Also, make room in the fridge for a small baking pan or plates on which the formed cookies will chill.
- Scoop out a tablespoon of cookie dough. Use a thumb to hollow out the center. Scoop out about 3/4 teaspoon of cream cheese mix using the smaller scoop. Place that inside the hollow. Fold the dough to enclose it, adding additional pinches of dough as needed to form a seal. You don't want any cream cheese visible, or it could ooze out! Flatten cookies between palms to make a fat disc. Set in fridge to chill as more cookies are shaped.
- Once all the cookies are shaped, pull out the coldest cookie balls to set, spaced out, on the baking sheet. Keep the remaining cookie balls chilled while the initial batch(es) bake.
- Bake for 12 to 14 minutes, until the cookies are golden. Let them rest on the sheet for 5 to 10 minutes, then transfer them to a rack to completely cool.
- Store cookies in an airtight container at room temperature for up to 3 days.
OM NOM NOM!
Follow me


