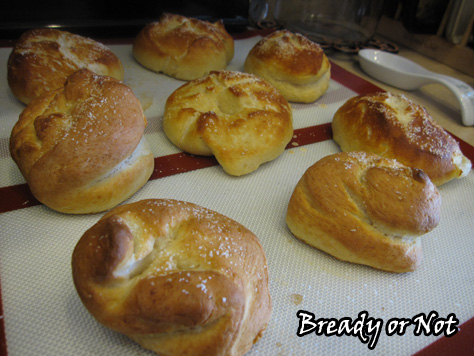
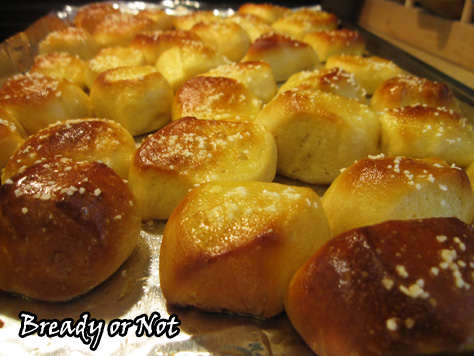
Bready or Not: Soft Pretzel Bites
These soft pretzel bites are bready perfection that fits in the palm of your hand.

I first featured this recipe on my old LiveJournal back in 2012. It’s one I’ve continued to make a couple times a year in the years since. The recipe is reliable and delicious!
If you’re intimidated by yeast dough, this is a good starter recipe. The dough comes together quite easily and it’s not persnickety to work with. I include directions for making it in a stand mixer and bread machine, but you can certainly make it by hand–it just takes some wrist work.
You don’t need fancy ingredients for this, either. It doesn’t even call for bread flour. Mind you, if you do plan to make pretzels often, I highly recommend grabbing pretzel salt. Unlike kosher salt, it doesn’t absorb into the baked dough, but maintains its crystalline texture and great taste. (I’ve been working on a tub of this stuff for almost four years! It doesn’t go bad, so hey.)
These pretzel bites taste best within a day of being made, but the fabulous thing is that these keep very well in the freezer. Just freeze them in a single layer on waxed paper, drop them in a gallon freezer bag, and ta-da! Pull out the whole bag or a few here and there when you need a pretzel bite fix over the next few weeks.
Because trust me, these things are addictive.
Modified from Jamie Cooks It Up!

Bready or Not: Soft Pretzel Bites
Ingredients
Dough:
- 1 1/2 cups warm water 90 to 100-degrees
- 2 Tb brown sugar packed
- 1 Tb instant yeast
- 6 Tb unsalted butter melted
- 2 1/2 teaspoons salt
- 4 1/2 - 5 cups all-purpose flour
Water bath:
- 12 cups water
- 3/4 cup baking soda
- 1 egg beaten until frothy
- pretzel salt or kosher salt
Instructions
If making with a stand mixer
- Pour 1 1/2 cups warm water into your mixer; use the standard paddle attachment. Add 6 tablespoons melted butter, 2 tablespoons brown sugar and 1 tablespoon instant yeast. Mix on low for 30 seconds or so. (If using active yeast, let it sit for about five minutes to get frothy.)
- Add 2 1/2 teaspoons salt and 2 cups of the flour; put dough hook on mixer. Turn mixer to low and add the rest of the flour, 1 cup at a time as the mixer runs. The flour is adequate when the dough pulls itself away from the sides of the bowl.
- Turn mixer to medium speed and let it knead for 5 minutes.
- Remove bowl from stand and cover with plastic wrap. Let the dough rise for 1 hour, or until doubled in size.
If making with a bread machine
- Place ingredients in machine in specified order. In many, that means liquids first. Add in brown sugar, melted butter, salt, 4 1/2 cups flour, and yeast.
- Set machine on a basic dough cycle. Monitor as it starts mixing and add more dough as needed to produce a soft, non-tacky dough; this will likely be 1/4 to 1/2 cup more. Let machine complete dough cycle and rise.
Now, regardless of how you start the dough
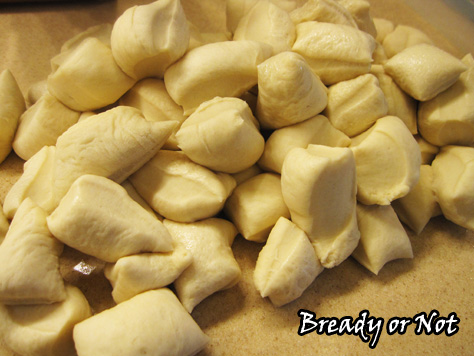
- Rub counter space with butter or apply cooking spray, and likewise prepare two rimmed cookie sheets. Using a sharp knife or pizza cutter, slice the dough into eight equal portions. Let dough rest for 5 to 10 minutes.
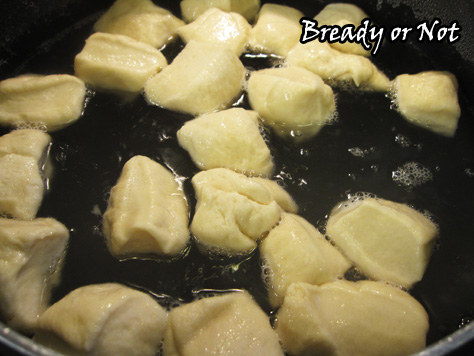
- While the dough is resting, pour 12 cups of water into a large pot; bring to a boil. Pour in 3/4 cup baking soda; it will get very frothy. Turn down the heat if necessary, keeping the water to a low boil.
- Preheat oven at 425-degrees.
- Return to the dough and roll each piece into a long rope. Cut each rope into little chunks about 2 inches wide.
- Carefully drop the chunks into the boiling water. Let them boil for 1 minute. Do a dozen or so at a time.
- Use a strainer or slotted spoon to remove dough pieces from the boiling water. Place pieces on the prepped cookie sheets. Continue until all the bites have had their bath.
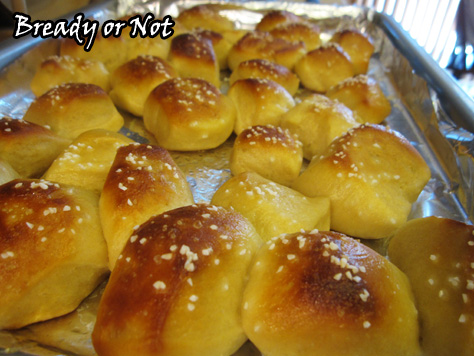
- Brush the beaten egg over the top of each dough piece and then sprinkle a bit of salt over the tops.
- Bake the bites for 10-14 minutes or until golden brown. They cook fast, so keep an eye on them.
- Let pans cool at least 10 minutes before you begin to indulge. Pretzels bites taste best eaten within a day, but can also be kept frozen for a few weeks and they thaw quickly. Eat at room temperature or slightly warmed.
OM NOM NOM!

Read More
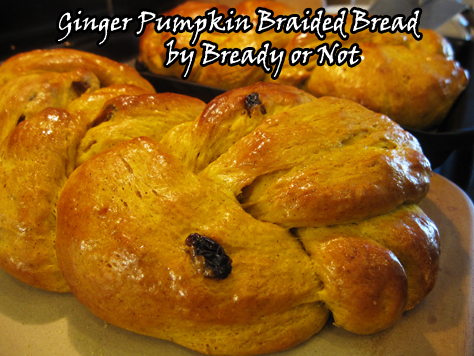
Bready or Not: Ginger Pumpkin Braided Bread
Bready or Not is full-out bready this week with a recipe that produces two gorgeous braided loaves of pumpkin bread!
This recipe from King Arthur Flour and was featured in their mailed catalog a while back. Like so many of their recipes, it’s an absolute winner.
The pumpkin puree doesn’t make this bread tacky, even as dough. It incorporates well and adds light taste and vivid color. Diced candied ginger and raisins create variations in texture. The spices play well with everything. Actually, you should make this bread just to smell it as it bakes.
The slices are divine, whether or not you add butter. It would also be delicious in something like bread pudding. YUM.
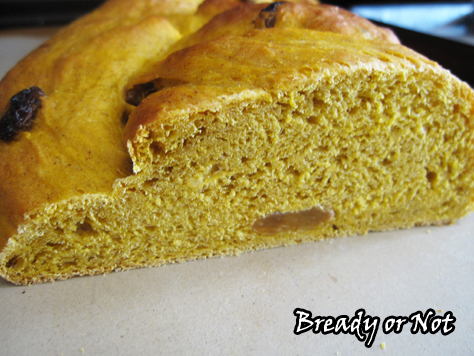
Plus, it’s just plain pretty.
Modified from King Arthur Flour.

Bready or Not: Ginger Pumpkin Braided Bread
Ingredients
- 4 1/2 cups bread flour
- 1 teaspoon cinnamon
- 1 teaspoon ground ginger
- 1/4 teaspoon ground cloves
- 1/3 cup white sugar
- 1 1/2 teaspoons salt
- 1 Tablespoon instant yeast
- 1 3/4 cups pumpkin puree 1 can
- 2 eggs room temperature
- 1/4 cup unsalted butter half stick, melted
- 1/2 cup golden raisins
- 1/3 cup diced candied ginger
- butter to brush on bread
Instructions
- In the large bowl of a stand mixer, combine the flour, spices, sugar, ginger, salt, and yeast.
- In a separate bowl, stir together the pumpkin, eggs and melted butter. Add the wet ingredients to the dry ingredients. Continue to stir until the dough begins to come away from the sides of the bowl. Knead the dough for 2 minutes; let it rest for 15 minutes. Knead for an additional 5 to 7 minutes, or until it's smooth. Add the raisins and candied ginger, and continue kneading just until they're incorporated.
- Transfer the dough to a lightly oiled bowl. Cover it with plastic wrap, and set it aside to rise for 1 to 1 1/2 hours, until about doubled.
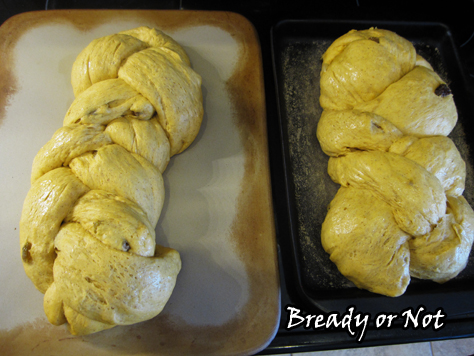
- Lightly grease a surface and turn out the dough onto it. Divide the dough in half, then divide each half into three pieces. Roll each piece into a 10-inch log.
- Place three logs together on a parchment-lined baking sheet. Braid them together, making sure to pinch together the ends or tuck them underneath. Repeat the process with the other three logs on another baking sheet. Lightly cover them with plastic wrap and let them rise another hour. They should be puffy, not necessarily doubled in size.
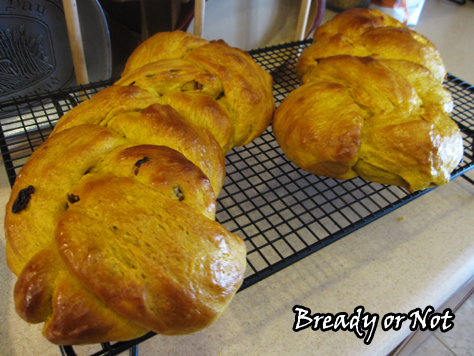
- Bake the loaves in a preheated 375-degree oven for 25 to 30 minutes, until lightly browned. A cake tester inserted in the center should come out clean. Brush butter over the loaves to give them a nice shine.
- Let the braids cool on a wire rack. Serve them warm or at room temperature. Loaves can also be frozen for later enjoyment.
- OM NOM NOM!

Read More
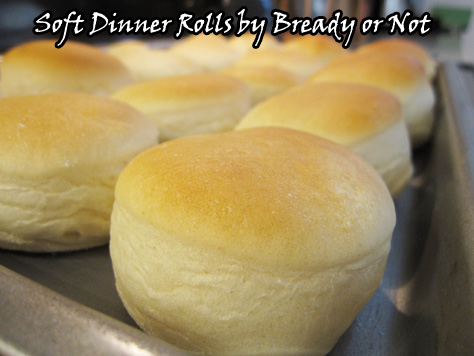
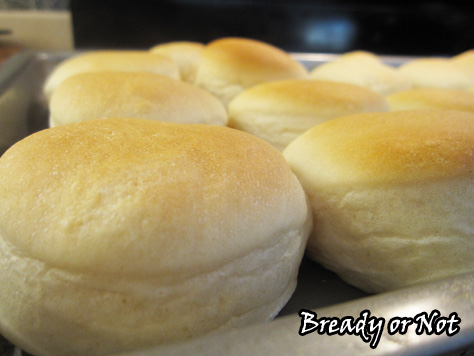
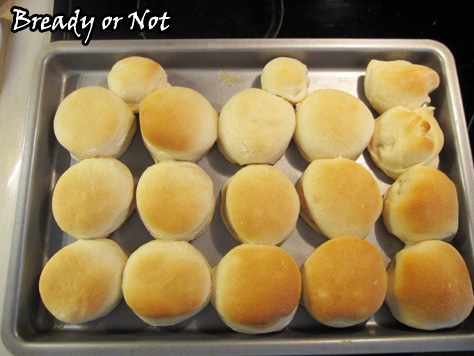
Bready or Not: Soft Dinner Rolls
Back when I first started Bready or Not in 2011, one of my first recipes was for Soft Dinner Rolls. I’m featuring it again today because it’s still a family favorite, and one I make regularly.
I used to be very intimidated by working with yeast. Would the dough rise? How would I know when it was ready? I used box mixes for a while and built up my confidence to handle the stuff from-scratch.
These soft rolls have never failed me. Other doughs are persnickety; this dough is not. The result is soft, and it bakes up into soft, luscious rolls.
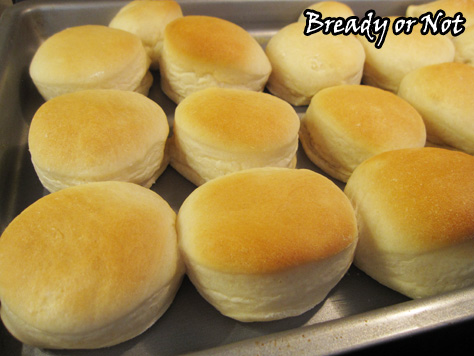
These are the rolls I make every year for Thanksgiving and Christmas. I can make them weeks in advance. They thaw fast. They keep for as long as six days in a sealed bag. Most importantly, they reheat and taste as fresh as ever (and can even be reheated another time, too).
If you’re shy about yeast rolls, give these a try! If you’ve already mastered yeast bread, add these to your repertoire–they are worth making again and again.
On the subject of yeast, the only kind I use is SAF Instant Yeast. I store it in a sealed plastic tub in the freezer; the yeast granules don’t freeze, but the cold preserves the yeast.


Bready or Not: Soft Dinner Rolls
Ingredients
- 1 cup warm water 110 degrees (temperature especially important if mixing by hand)
- 1/4 cup vegetable oil
- 2 Tablespoons white sugar
- 3 cups bread flour
- 1 teaspoon kosher salt
- 2 1/4 teaspoons instant yeast or 1 packet bread machine yeast
Instructions
If making by hand
- Mix all ingredients together and knead until soft. Place the dough in a bowl and lightly cover with plastic wrap. Let dough rise 45 minutes to 1 hour; knead down again. Let rise another 45 minutes to 1 hour.
If making in a bread machine
- Add ingredients in the order specified. That often means the liquids first. Set the machine on dough cycle and start; this should run for about 2 hours.
- Prepare a cookie sheet or jelly roll pan by greasing lightly with butter. When the dough is done, lightly flour a mat or flat surface. Gently flatten the dough with hands. It's so soft, a rolling pin isn't necessary. Use a biscuit cutter or other round shape to cut out rolls. Place them spaced out a bit on the pan; it should produce 12 to 15 rolls, depending on the cutter. Lightly cover pan with plastic wrap and let it sit for an hour, or until rolls have doubled in size.
- Preheat oven at 350-degrees. Bake the rolls for 10 to 15 minutes, watching them for desired brownness. Let cool a few minutes before serving.
- Completely cooled rolls can be frozen in gallon freezer bags for several months. Sealed rolls will keep well at room temperature for at least 6 days.
- OM NOM NOM!
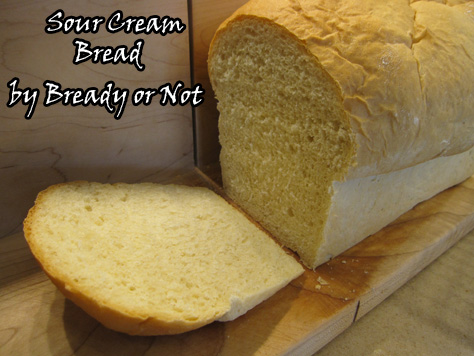
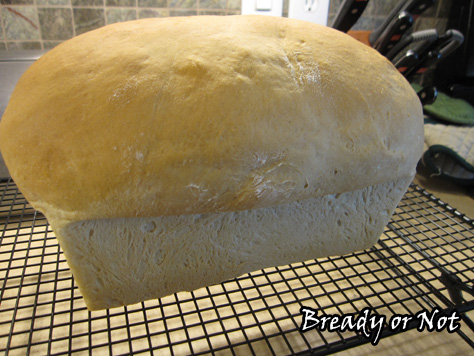
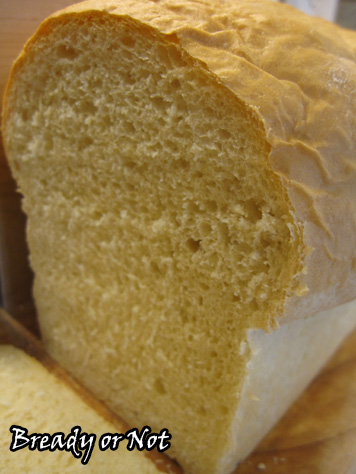
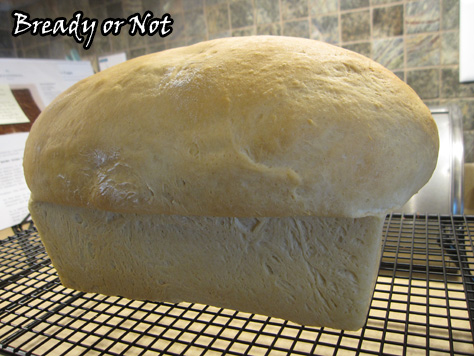
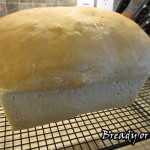
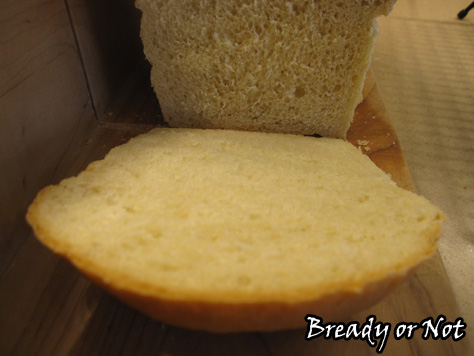
Bready or Not: Sour Cream Bread
Make note: this recipe doesn’t make sourdough bread. Instead, it uses sour cream to create tender, delicious sandwich bread that isn’t the least bit sour.
I always keep sour cream around. It’s often on sale, it keeps well, and I can use it for tacos, salads, or making this bread. I actually make this bread on an almost weekly basis.
Different brands of sour cream have different consistency. That means you need to keep an eye on this in the mixing stage. If it looks lumpy, add more water. If it’s looser, add more flour.
This loaf bread may be finicky, but it’s worth the effort. The end result has that perfect fresh bread smell and soft texture. It makes your whole house smell cozy and happy, and does the very same to your belly.
I originally found this recipe in a fabulous book, The Bread Lover’s Bread Machine Cookbook by Beth Hensperger.
Bready or Not: Sour Cream Bread
Ingredients
- 1/2 cup plus 1 Tablespoon water
- 1 cup sour cream use nonstick spray on measuring cup
- 3 1/2 cups bread flour
- 1 Tablespoon light brown sugar
- 2 teaspoons vital wheat gluten
- 1 1/4 teaspoons salt
- 2 1/4 teaspoons active dry yeast
Instructions
- If you're using a bread machine, add the ingredients in the recommended order and run on dough cycle or full bread mode. I prefer to do dough cycle and bake in the oven.
- If you're using a stand mixer, blend water and sour cream. In a separate bowl, combine bread flour, brown sugar, gluten, salt, and yeast. Mix wet and dry ingredients together and knead with a dough hook.
Either method: Keep an eye on the texture. If it's wet or too tacky, add more flour. If it's too lumpy or thick, splash in a tiny bit more water as needed.
- Let dough rise until it has doubled, 1-2 hours. Grease or non-stick spray a bread pan.
- Lightly grease a surface and dump your dough onto it. With your greased hands, form the dough into a loaf shape by gently folding. Set in the pan--or glop it in, and smooth it out (that's still a professional method, I think). Cover with lightly greased plastic wrap or a shower cap.
- Let dough rise in a warm spot until it's crested to desired height, 30-60 minutes. Watch it.
- Preheat oven to 350-degrees.
- Bake bread for 20 minutes. Cover the top with foil to prevent heavy browning, then bake for an additional 15-20 minutes. When it's done, it'll sound hollow when tapped.
- Remove bread from oven and hold it over a rack so it will gently drop out; use a spatula to carefully loosen it, if needed. If you want, you can brushed the top with some butter to soften the crust and give it a shine.
- Let the bread cool at least 45 minutes before cutting. Also, you can let it cool completely and then wrap it several layers of plastic wrap before placing it in the freezer. Keeps well in freezer up to one month.
OM NOM NOM.
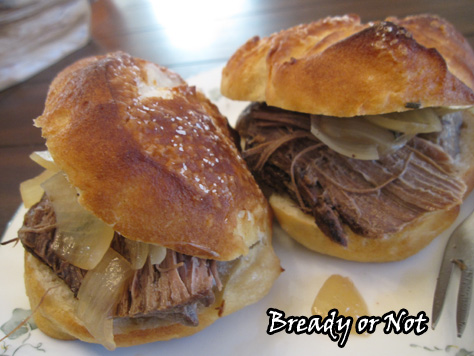
Bready or Not: Pretzel Sandwich Buns
It seems a lot of standard buns are just… there. A thing to hold meat. They aren’t memorable or flavorful.
You want something better than a mere meat sling? MAKE THIS.
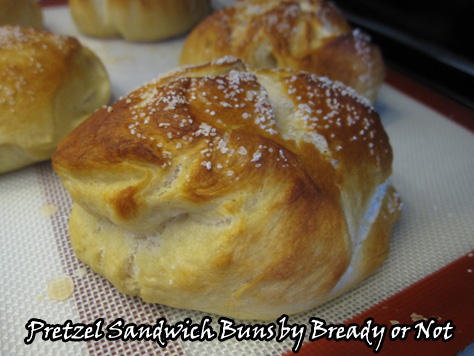
These buns are soft and chewy, tender yet strong. They can cradle juicy meat without instantly becoming a soggy mess, but they won’t break your teeth, either. That little bit of salt on the top complements just about everything. Want to use these for hamburger buns? Make big rounds. Or shape them into hot dog buns. Or as rolls that you can use for sliders, or simply slice open to add butter.
They keep great in a sealed container for a few days, and also freeze and thaw in a fabulous way.
Trust me, once you make these buns, you’ll never settle for the grocery store stuff again.
Bready or Not: Pretzel Sandwich Buns
Ingredients
Dough Ingredients
- 1 3/4 cups warm water
- 2 tablespoons unsalted butter
- 3/4 teaspoon salt
- 4 1/2 cups all-purpose flour or bread flour bread flour is best
- 1/4 cup nonfat dry milk
- 2 teaspoons instant yeast
Topping Ingredients
- coarse sea salt like pretzel salt or kosher salt
Water Bath
- 2 quarts water
- 1 Tablespoon salt
- 1/4 cup baking soda
Instructions
- Mix and knead the dough ingredients — by hand, mixer, or bread machine — to make a smooth, slightly sticky dough. If you're making by hand, allow the dough to rise in a lightly greased bowl, covered, for about 1 hour, until doubled. In bread machine, let the full dough cycle run through.
- Gently deflate the dough, and transfer it to a lightly greased work surface.
- Divide the dough into as many buns as you want. About 8 to 10 will work for sandwich size, while about 12 can be done at about slider size. Shape each piece into a smooth ball.
- Place the balls on a lightly greased baking sheet, cover with plastic wrap, and let rest for 15 minutes.
- While that's happening, preheat the oven to 400°F and prepare the water bath for the stovetop. Bring the water, salt, and baking soda to a boil in a large pot.
- Gently lower several dough balls at a time into the water bath. Cook for 30 seconds, flip over, and cook for 30 seconds longer. Using a slotted spoon, return the buns to the baking sheet.
- Using scissors or a sharp knife, cut half-inch deep crosses into the center of each bun. Sprinkle with coarse salt.
- Bake the buns for 20 to 24 minutes (lower time for smaller rolls/buns), or until they're brown. Remove them from the oven, and transfer to a rack to cool.
OM NOM NOM