


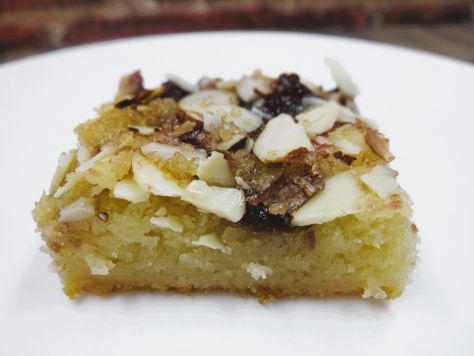
Bready or Not: Dutch Letter Bars
These Dutch Letter Bars are super-easy to make. Soft, chewy, and crunchy, these have it all.

The name for these bars is kind of weird, isn’t it? These are bars, no letter involved. Well, they are made to taste like a Dutch pastry that is traditionally shaped in a letter S. You can read all about it here.
The bar version mimics the flavor and texture, but is a lot easier to make! In the US, it’s apparently more common to find in Iowa.
This is modified from a recipe in Better Homes & Gardens Christmas Cookies 2021.
Bready or Not: Dutch Letter Bars
Equipment
- 13×9 pan
- aluminum foil
- nonstick cooking spray
Ingredients
- 1 cup unsalted butter (2 sticks) softened
- 7-8 ounces almond paste store-bought or homemade
- 2 large eggs
- 2 cups white sugar
- 2 cups all-purpose flour
- 3/4 cup raspberry jam or mixed fruit jam
- 1/2 cup sliced almonds
- 1 Tablespoon turbinado sugar
Instructions
- Preheat oven at 350 degrees. Line the 13×9 pan with foil. Add a coating of nonstick spray.
- In a large bowl, beat together butter, almond paste, and eggs. Add the white sugar, beating until light and fluffy. Gradually beat in the flour until combined. Spread dough in the prepared pan.
- Measure the jam into a microwave-safe bowl and gently warm until it is soft and spreadable. Dollop the jam on top of the dough and spread out, swirling with dough slightly. Sprinkle the almonds on top followed by the turbinado sugar.
- Bake for 35 to 45 minutes, until the top is golden brown and a toothpick in the middle comes out clean. Cool completely.
- Use the foil to lift the contents onto a cutting board, slice into bars. If stacking in storage containers, place waxed paper to make it tidier. Store at room temperature.
OM NOM NOM!
Bready or Not Original: Chocolate-Hazelnut Sables
These Chocolate-Hazelnut Sables are a fancy kind of shortbread, perfect to pair with some coffee or tea!

The chocolate flavor here is pleasant and deep thanks to the pairing of cocoa powder and mini chocolate chips. The hazelnuts provides a welcome sporadic crunch.
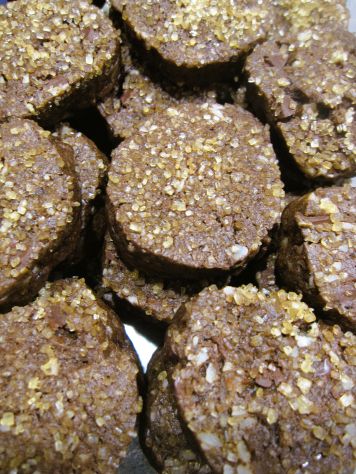
The hazelnuts will need to have their brown papery skin removed for the recipe. Look at the end of the cookie directions for instructions on how to do that! It’s a fiddly, time-consuming thing, but it’s not hard, but do be careful with the fizzing-hot baking soda.
Bready or Not Original: Chocolate-Hazelnut Sables
Equipment
- food processor
- plastic wrap
- food scale
- parchment paper
- knife or bench knife
Ingredients
- 1/2 cup blanched hazelnuts see note for blanching advice
- 3 oz mini semisweet chocolate chips
- 1 1/3 cups all-purpose flour
- 1/3 cup unsweetened cocoa powder sifted
- 1/4 teaspoon baking soda
- 1/4 teaspoon salt
- 1/2 cup unsalted butter (1 stick) room temperature
- 1/4 cup white sugar
- 1/4 cup brown sugar packed
- 1 large egg
- 1/2 teaspoon vanilla extract
- 1/4 cup turbinado sugar for topping
Instructions
- Use the food processor to finely chop the hazelnuts. Transfer them to a bowl with the mini chocolate chips.
- In another bowl, stir together the flour, cocoa, baking soda, and salt. Set aside.
- In a mixing bowl, beat together the butter and white and brown sugars until they are light and fluffy. Add the egg and vanilla. Gradually mix in the dry ingredients, scraping the bottom of the bowl a few times. Fold in the hazelnuts and chocolate.
- Divide the dough between two long sheets of plastic wrap. Form the dough into logs, then encase in plastic, rolling to smooth out. Each should be about 1 inch high and 9 inches long.
- Wrap airtight and chill for at least an hour, or freeze for upwards of a month; thaw later in fridge.
- When it is baking time, preheat the oven at 350. Lay parchment paper on baking pan. Place turbinado sugar in a saucer.
- Use a knife or bench knife to slice logs about 1/4-inch thick. Press the top of each cookie into the turbinado sugar, then set spaced out on parchment.
- Bake for about 14 minutes. Let set for 5 minutes, then move to a cooling rack. Store in a sealed container at room temperature.
OM NOM NOM!
Notes
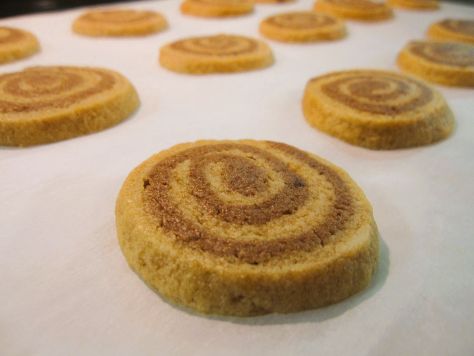
Bready or Not Original: Cookie Butter and Chocolate Pinwheel Cookies
These Cookie Butter and Chocolate Pinwheel Cookies are loaded with flavor and in an incredibly fun shape.
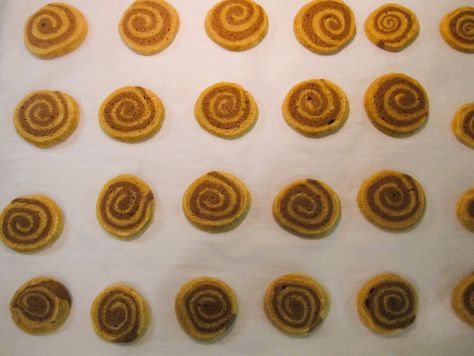
As there is always someone out there who hasn’t encountered the wonders of cookie butter yet: it consists of pulverized spice cookies and oil, combined to form a cohesive, spreadable mix very similar to peanut butter. You can actually substitute it for peanut butter in most any recipe. You can buy brands like Biscoff or generic brands at stores like Walmart; look for it with the peanut butter. Speculoos is found at Trader Joe’s.

Cookie butter tastes like cookies in their purest, sweetest form. Therefore, it is awesome paired with chocolate. Both flavors shine through in these firm yet softly-chewy cookies.
Bready or Not Original: Cookie Butter and Chocolate Pinwheel Cookies
Equipment
- kitchen scale
- plastic wrap
- waxed paper
Ingredients
- 1 ounce semisweet chocolate chips
- 1/2 cup white sugar
- 1/2 cup unsalted butter (1 stick) softened
- 1 egg
- 1 teaspoon vanilla extract
- 1 1/2 cups all-purpose flour
- 1/2 teaspoon baking powder
- 1/4 teaspoon salt
- 1/4 cup creamy cookie butter such as Biscoff or Speculoos
Instructions
- In a microwave-safe bowl, carefully zap the chocolate chips long enough to make them soft and smooth when stirred. Set aside to cool.
- In a large mixing bowl, beat together the sugar, butter, egg, and vanilla until creamy. Gradually mix in the flour, baking powder, and salt, until just combined.
- Weigh the dough and divide in half.
- To one half, add the melted chocolate, beating until the color is consistent. In another bowl, mix together the cookie butter and dough until the color is again consistent. Shape each piece into a disc, wrap them separately in plastic wrap, then chill for at least an hour.
- Roll out the chocolate dough between two sheets of waxed paper to form a 12×7-inch rectangle. Repeat with the cookie butter dough. Peel away the waxed paper, setting one dough atop the other. Gently press together. Roll up, like a jelly roll, starting with the long 12-inch side. Again wrap the dough in plastic to chill for at least 2 hours, or add extra wrap and freeze up to a few weeks.
- When it is time to bake, preheat the oven at 375 degrees. Line a sheet with parchment paper. Use a sharp knife or piece of unwaxed dental floss to cut 1/4-inch slices of dough. Set spaced out on parchment.
- Bake 8 to 9 minutes. Cool for a few minutes before transferring to a cooling rack. Store cookies in a sealed container at room temperature.
OM NOM NOM!
Bready or Not Original: Sourdough Oatmeal Cookies
These Sourdough Oatmeal Cookies are cakey and delicious, a perfect comfort food.

The sourdough doesn’t act as a leavening agent here, but adds nuanced flavor and lends a unique breadiness to the texture. I doubt anyone would eat these and immediately identify they include a starter, but they would probably know something is different.

I added dried cranberries and walnuts to these cookies, but mix in whatever dried fruit, nuts, seeds, or chocolate chips that you want. Just don’t exceed 2 1/2 cups of add-ins. Or try to fool people into thinking dark raisins are chocolate chips. That’s just evil.
By the way, I baked up sourdough recipes like this one because I have maintained a starter for book research reasons: my next release, A House Between Sea and Sky, features a sourdough starter named Mother as an important character. Find out more (and preorder) here!
Bready or Not Original: Sourdough Oatmeal Cookies
Equipment
- parchment paper
- cookie scoop or spoon
Ingredients
- 1 cup unsalted butter (2 sticks) softened
- 3/4 cup brown sugar packed
- 1/2 cup white sugar
- 2 large eggs room temperature
- 2 teaspoons vanilla extract
- 1/2 cup sourdough discard (113 grams)
- 3 cups rolled oats also called old fashioned oats
- 2 cups all-purpose flour
- 1 teaspoon baking soda
- 1/2 teaspoon baking powder
- 2 teaspoons ground cinnamon
- 1 teaspoon salt
- 1 1/2 cups dried cranberries
- 1 cup walnuts chopped
Instructions
- Preheat oven at 350 degrees. Line baking sheet with parchment paper.
- In a large bowl, beat together butter, brown sugar, and sugar until light and fluffy. Add eggs one at a time followed by the vanilla and sourdough discard.
- In another bowl, stir together rolled oats, flour, baking soda, baking powder, cinnamon, and salt. Gradually mix the dry ingredients into the wet, scraping the bottom of the bowl a few times to make sure everything is incorporated. Fold in the cranberries and walnuts to distribute.
- Use a cookie scoop or spoon to dole out the dough, spaced out, on the parchment paper. Bake for 10 to 12 minutes; the cookies should be golden at the edges and no longer glossy on top.
- Transfer cookies to a rack to fully cool. Store in a sealed container at room temperature. Cookies keep for at least 3 days.
OM NOM NOM!
Bready or Not EXTRA CHEESY: Farmer’s Cheese Cookies
Welcome to the second installment of our special month of Bready or Not. My cheese-centric cozy mystery Cheddar Luck Next Time just came out yesterday (picture the Kermit-flail gif) so we’re celebrating with another cheesy recipe from the Bready or Not archives.
This week’s feature is Farmer’s Cheese Cookies.
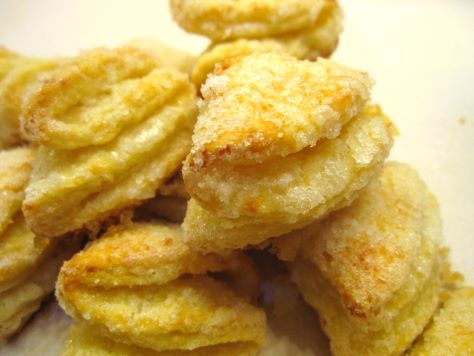
These cookies aren’t cheesy in a gooey, cheese-pull kind of way. Instead, the cheese here adds a touch of savory flavor and a lot of light, chewy texture. Expect a dry, crumbly texture in the cheese. Mine became somewhat powdery as I broke it down, which was fine. I was able to incorporate everything with an extra touch of water.
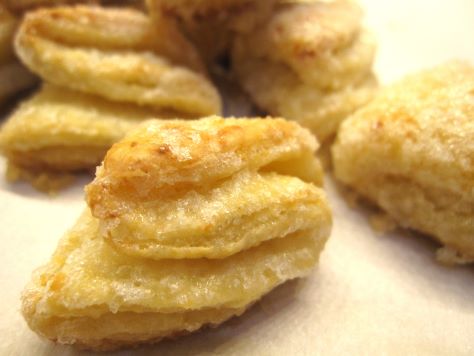
Cookies like this are traditional in Ukraine and Russia. Look for a product like Ukrainian Tvorog Farmer’s Cheese at your local import markets.

The end result is a cookie that, quite honestly, tastes fancy–light, crisp, sugary, like something that one would find in a fine bakery. Most people wouldn’t guess there’s cheese in the dough, I bet, but they’ll know there’s something different about them. Something delicious.

Please grab a copy of Cheddar Luck Next Time, which features an autistic (like me!) lead character with a passion for cheese (like me!).
Amazon: paperback | ebook (affiliate links)
Barnes & Noble: paperback & ebook
Bookshop: paperback
Bready or Not: Farmer’s Cheese Cookies
Equipment
- grater or food processor
- pastry blender
- 3-inch round cutter or the top of a glass
- parchment paper
- saucer or bowl
- Rolling Pin
Ingredients
- 1 cup unsalted butter 2 sticks, chilled
- 8 oz farmer's cheese such as Ukrainian Tvorog cheese
- 2 cups all-purpose flour
- 2 egg yolks
- 2-3 Tablespoons water
- 1 1/2 cups white sugar
Instructions
- Grate the butter using a hand grater or a grater attachment on a food processor. In a large bowl, use a pastry blender to cut in the cheese, which will be crumbly. Add the flour, followed by the yolks and water. Knead the dough until it comes together in a cohesive mass.
- Form the dough into a disc and encase it in plastic wrap to chill for anywhere from an hour to several days.
- When it’s cookie time, preheat oven at 375-degrees. Line a large baking sheet with parchment paper. Place a small amount of water in a saucer or bowl. Measure the white sugar into a deep bowl.
- Prepare a clean work surface with a dusting of flour. Break off some of the dough and roll it into a thin layer, like for a pie crust. Use the cutter to slice out 3-inch rounds; place the leftover and unused dough to chill in the fridge while cookies are shaped.
- Dampen fingers in the prepared water. Brush wet fingers over one side of a dough round. Dip moist dough into the sugar to coat it. Fold in half with the sugared portion on the inside. Dampen fingers and stroke another folded side of the dough, and dip that in sugar. Fold a final time with the sugared section on the inside. Use wet fingers on outside of cookie and coat that in sugar, too. Gently press the pleats together to prevent them from unfolding during baking. Place formed cookie on sheet and repeat process with remaining rounds.
- Bring together dough scraps, using a little water if needed, to roll out again. Use rest of dough to form cookies.
- Bake in batches for 19 to 22 minutes, until puffed and set with a golden base. Store in a sealed container at room temperature.
OM NOM NOM!
Bready or Not Original: Rainbow Sprinkle Cookies
These Rainbow Sprinkle Cookies taste eerily like birthday cake. They are super-sweet, vivid in flavor and color.

I confess, I love rainbow sprinkles. They are just so FUN. They are so easy to customize, too. Go classical just-because, or to celebrate pride. Or use colors of a favorite team, or to designate a certain holiday.

Note that the cookie dough here needs to chill for at least a few hours, but can also wait in the fridge for a couple days. I think this dough is a great one to make ahead to spare yourself some extra effort on baking day!

Bready or Not Original: Rainbow Sprinkle Cookies
Equipment
- plastic wrap
- parchment paper
- cookie scoop or spoon
Ingredients
- 1 cup unsalted butter (2 sticks) softened
- 1 1/2 cups white sugar
- 2 large eggs room temperature
- 1 Tablespoon vanilla extract
- 1/2 teaspoons almond extract
- 2 1/4 cups all-purpose flour
- 3/4 cup bread flour
- 2 teaspoons baking powder
- 2 teaspoons baking soda
- 2 teaspoons cream of tartar
- 1 teaspoon kosher salt
- 2 tablespoons milk or half & half
- 1 cup rainbow sprinkles plus 1/2 cup for topping
Instructions
- In a large bowl, beat butter and white sugar until fluffy. Add eggs one at a time followed by the vanilla and almond extracts.
- In another bowl, combine the flours, baking powder, baking soda, cream of tartar, and salt. Gradually add the dry ingredients to the butter mixture along with the milk. Scrape the bottom of the bowl to make certain everything is incorporated. Fold in the sprinkles.
- Wrap dough in plastic wrap and set to chill for at least 2 hours, or up to 3 days.
- When it is baking time, preheat oven at 350 degrees. Line a baking pan with parchment paper. Place the topping sprinkles in a small bowl.
- Shape the cookies by using a scoop or a spoon. Dip the top of each round into the sprinkles. Set spaced out on the cookie sheet.
- Bake for 10 to 13 minutes, until set. Let them rest on the sheet about 10 minutes before moving to a cooling rack.
- Pack into a sealed container and store at room temperature.
