


Bready or Not: Apple Slice Tray Bake
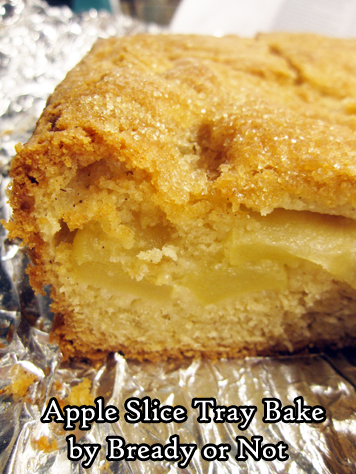
This Apple Slice Tray Bake would simply be an Apple Cake to most Americans. Whatever you call it, it’s packed with apples and delicious.
This is third consecutive recipe I’ve modified from the Bake from Scratch Magazine July/August 2020 Ireland-themed issue. I still have a few more things I want to try in the coming months, too!

I’ve found that French, Irish, and British apple cake recipes tend to be lighter on sugar and spices than typical American recipes. The focus is really on the apples.
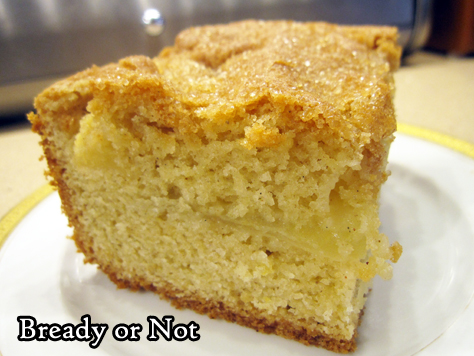
I used Honeycrisps here, which are one of my favorite apples to eat outright or bake with! Two big apples will work.
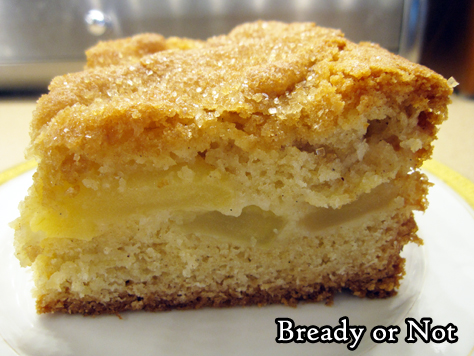
This bakes up light, lofty, and cakey, with a sugar-crusted top and a lovely flavor of apples throughout. The pieces freeze and thaw very well, too, meaning you can enjoy this like it is fresh but spread over days or weeks!
Bready or Not: Apple Slice Tray Bake
Equipment
- 9×9 baking pan
- uneven spatula
Ingredients
Apple layer:
- 2 large baking apples Honeycrisp work well
- 1 Tablespoon lemon juice
- 1 Tablespoon white sugar
Cake:
- 1 1/4 cups unsalted butter (2 and a half sticks) room temperature
- 1 1/2 cups white sugar
- 4 large eggs room temperature
- 1 1/2 teaspoons vanilla bean paste or substitute vanilla extract
- 3 cups all-purpose flour
- 3/4 teaspoon salt
- 4 1/2 teaspoons baking powder
- 1/2 teaspoon cinnamon
- 1/8 teaspoon allspice
- 2 Tablespoons turbinado sugar
Instructions
- Preheat oven at 350-degrees. Line a 9×9 pan with foil and apply nonstick spray.
- Peel and core the apples, then slice to about 1/4-inch thickness. Place slices in a large bowl and toss them with lemon juice and 1 Tablespoon white sugar, until apples are coated. Set aside.
- In a big mixing bowl, beat butter and white sugar for several minutes, until blended and fluffy. Add eggs, one at a time, mixing in well and scraping bowl afterward. Add vanilla. The batter may look curdled, but that’s okay.
- In a separate bowl, stir together flour, salt, baking powder, cinnamon, and allspice. Gradually mix the dry ingredients into the wet.
- Spread about half of the batter into the pan, using an uneven spatula to form an even layer. Arrange apple slices, flat side down, to cover the batter entirely. Top with the remaining batter, using the uneven spatula again to even out as much as possible. Sprinkle turbinado sugar all over the top.
- Bake until the middle of the cake passes the toothpick test, which will be from 1 hour to 1 hour and 15 minutes. Cover pan with foil about halfway through to prevent it from browning too much.
- Let cool in pan for an least 10 minutes, then use foil to lift cake onto a cutting board. Slice into squares. Tastes best warmed and at room temperature. Pieces can also be shrouded in plastic wrap and frozen for later enjoyment.
OM NOM NOM!
Bready or Not: Honey Oat Pie with a Cinnamon Pie Crust
This is a pie like none I have made before: like a gigantic chewy oatmeal cookie with a spiced crust, embodied with a refreshing zing of whiskey.
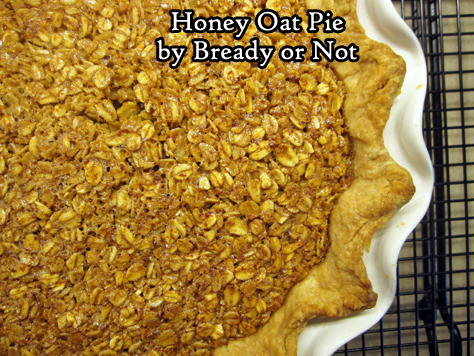
This Honey Oat Pie in a Cinnamon Pie Crust will blow your mind in the best of ways. Texture wise, it is moist and chewy without being soggy (be sure to use old-fashioned/rolled oats!).
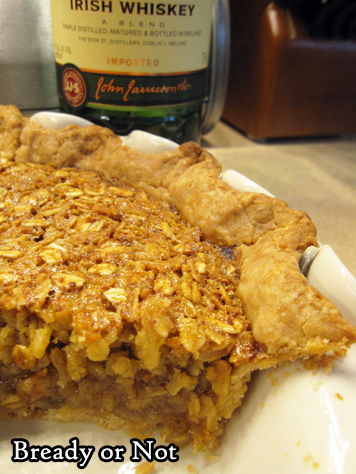
Flavor-wise, you taste the toasted oats, a wonderful mix of warm spices, and the freshness of the whiskey. There’s only a tablespoon and a half in there but the flavor of the whiskey still comes through.
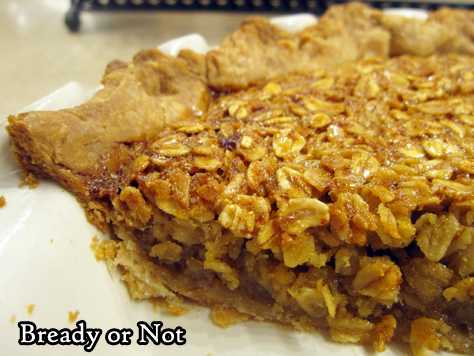
I used Jameson Irish Whiskey, in keeping with the origins of the original version of the recipe: the July/August issue of Bake from Scratch Magazine, my favorite food magazine these days.

I imagine you can omit the whiskey from the recipe without it being detrimental to the taste or texture, but I haven’t tried that myself.
This is a great pie to have for breakfast (the alcohol’s effect burns off in baking), or snack, or dessert.
Bready or Not: Cinnamon Pie Crust
Equipment
- food processor
- pie plate
- plastic wrap
Ingredients
- 1 1/2 cups all-purpose flour
- 1 1/2 Tablespoons white sugar
- 1 teaspoon kosher salt
- 1 1/2 teaspoons ground cinnamon
- 1/2 cup unsalted butter 1 stick, cold, cut into chunks
- 3 Tablespoons ice water plus more if needed
Instructions
- In a large food processor, pulse together the flour, sugar, salt, and cinnamon. Add the butter pieces. Pulse until they are almond-sized, then add the ice water. Pulse until mixture can form a ball, adding a touch more water if needed to make it cohesive.
- Turn out dough onto a lightly floured surface. Gently knead to shape into a disk. Tightly encase in plastic wrap and let chill in fridge for at least an hour, or up to a few days. Dough can also be frozen for up to two months.
OM NOM NOM!
Bready or Not: Honey Oat Pie
Equipment
- pie plate
- parchment paper
- pie weights
Ingredients
- single-layer pie crust
- 1 1/3 cups old-fashioned oats also called rolled oats
- 2/3 cup brown sugar packed
- 1 1/4 teaspoons kosher salt
- 1/4 teaspoon ground ginger
- 1/8 teaspoon ground nutmeg
- 1/2 cup light corn syrup
- 6 Tablespoons unsalted butter melted
- 1/3 cup honey
- 1 1/2 Tablespoons Irish whiskey such as Jameson
- 2 teaspoons vanilla extract
- 4 large eggs room temperature
Instructions
- Preheat oven at 400-degrees
Prepare pie crust
- Let pie dough soften at room temperature for 10 to 15 minutes. Lightly flour a surface and roll out dough to a 12-inch circle and transfer it to a 9-inch pie plate. Press into plate to shape, crimping edges as desired. Freeze crust until firm, about 15 minutes.
- Drape a large piece of parchment paper over pie crust. Fill to the top with pie weights.
- Bake crust until edges are turning golden, about 10 to 15 minutes. Carefully remove weights and parchment paper.
- Bake crust an additional 10 minutes to set. Cover the edges with foil if it is getting brown too quickly. Set aside on rack to cool while the filling is assembled.
Prepare filling
- Reduce oven temperature to 350-degrees.
- Line a rimmed baking pan with parchment paper. Place oats in pan.
- Bake them until they are lightly toasted, about 10 minutes, giving them a stir or two during. Set them aside to cool.
- Lower oven temperature again, this time to 325-degrees. Move the oven rack to the lower third of the oven.
- In a big bowl, mix together the brown sugar, salt, ginger, and nutmeg. Add the corn syrup, melted butter, honey, whiskey and vanilla, making sure to scrape the bottom of the bowl. Add eggs one at a time, stirring well after each addition, and end by incorporating the oats until they are coated. Pour everything into the parbaked crust.
- Bake until the filling is set and slightly puffed, about 40 minutes. Check on the pie about halfway and cover the edges the foil if they are getting too brown. The done pie will register at 200-degrees if checked with an instant thermometer.
- Let pie cool completely on rack before slicing in. Store covered by foil in the fridge or at room temperature. Keeps for several days.
OM NOM NOM!
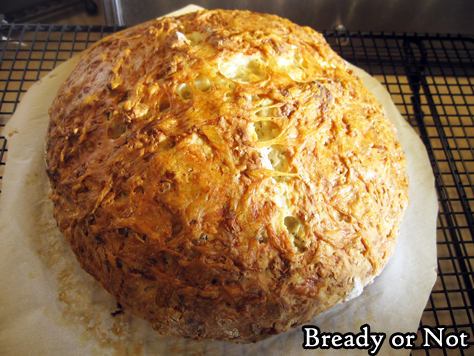
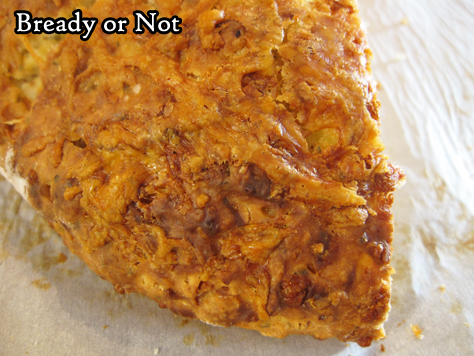
Bready or Not: Irish Cheddar Soda Bread
If you know me at all, you know I love cheese. One of my forever favorites is Kerrygold Dubliner, which I can buy in bulk at Costco almost all the time. That makes the use of a hefty amount of Dubliner all the more affordable in this amazing Irish Cheddar Soda Bread.

Of course, you can use another kind of Irish cheddar, or cheddar from anywhere in the world. Whatever you use will be delicious and amazing in this bread.
This recipe is the first in a series of re-worked recipes from a fantastic issue of Bake from Scratch Magazine last year. The July/August issue was all about Ireland, with loads of Irish recipes, and I had a blast baking my way through and making my own versions of deliciousness.
(Truly, if you love to bake, I highly recommend Bake from Scratch. I get a lot of food magazines, and it is my favorite. I find several things I want to make in each issue, which I can’t say about any of my other subscriptions.)

This bread is perfect along with a roast or soup or stew, or all by itself with a generous pat of butter (Kerrygold being best, of course).
You might think I’m getting paid to endorse this Kerrygold stuff and Bake from Scratch. I wish! No, I’m just a total fan.
Bready or Not: Irish Cheddar Soda Bread
Equipment
- parchment paper
- instant thermometer
Ingredients
- 3 2/3 cup all-purpose flour
- 1 1/2 teaspoons kosher salt
- 1/2 teaspoon baking soda
- 1 cup Irish aged white cheddar cheese (113 grams) coarsely grated, divided
- 2 teaspoons dried parsley or other herbs
- 1/2 teaspoon black pepper
- 2 cups buttermilk or substitute soured milk, see note
Instructions
- Preheat oven at 450-degrees. Line a baking pan with parchment paper.
- In a large bowl, stir together flour, salt, and baking powder. Add about 2/3 cup of cheese, herbs, and pepper. Form a well in the middle and add the buttermilk. Use a hand to mix everything, kneading and clawing everything together; note that the dough will be very sticky and clumpy.
- Once it can be patted into a round, transfer it to the parchment paper. Reshape a bit if needed. Dip a knife in some flour, and slash an inch-deep X broadly across the top of the round; this is to release steam and, according to folklore, evil fairies. Sprinkle the remaining 1/3 cup of cheese on top.
- Bake for 15 minutes. Reduce oven temperature to 400-degrees. If the round is already looking quite brown, carefully cup some foil over the top.
- Bake for another 20 minutes. The bread is done when it is browned and registers 200-degrees or more on a digital thermometer. If the bottom is tapped, it should sound hollow.
- Let cool for about 30 minutes before cutting in. Bread is best served warm; easily reheat slices in the oven later. Pieces can also be frozen.
OM NOM NOM!
Notes
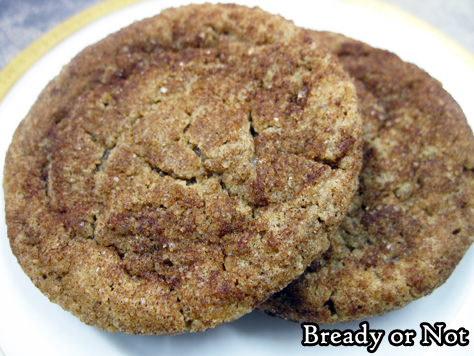
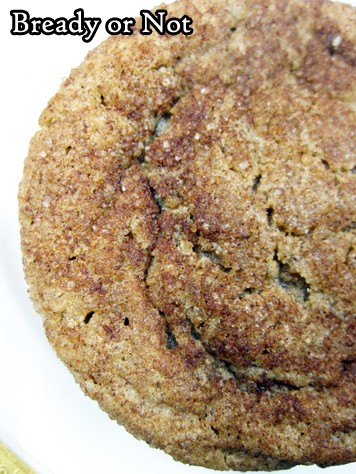
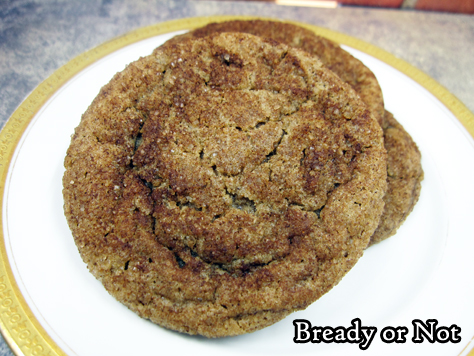
Bready or Not Original: Cinnamon-Coffee Cookies
These Cinnamon-Coffee Cookies do it all. They are warmly-spiced with a coffee-forward flavor.

Plus, they are soft and chewy, which really is how I prefer cookies to be. Crunchy cookies are good, too, but cookies like this? Oh yeah.
My husband’s work lives on coffee. Needless to say, they adored these cookies–with coffee. Bring on the caffeine in all forms, right?
The ingredient list for this looks long, but that’s because it has lots of spices. It really comes together pretty fast. If you want to speed things along at baking time, mix together the dry ingredients the day before.
These cookies will brighten your day. Have them for breakfast. Or a dessert. Or a mid-afternoon pick-me-up. The baked-in espresso (plus that sugar) will do a lot to brighten your day!
Bready or Not Original: Cinnamon-Coffee Cookies
Equipment
- tablespoon scoop
Ingredients
Dough
- 2 teaspoons espresso powder
- 1 Tablespoon hot water
- 1/2 cup unsalted butter 1 cube, room temperature
- 1/2 cup shortening
- 3/4 cup white sugar
- 3/4 cup brown sugar packed
- 2 teaspoons ground cinnamon
- 1 teaspoon baking powder
- 1/2 teaspoon ground nutmeg
- 1/4 teaspoon baking soda
- 1/4 teaspoon salt
- 1/4 teaspoon ground cloves
- 2 eggs room temperature
- 1 teaspoon vanilla extract
- 2 1/4 cups all-purpose flour
Topping
- 1/2 cup turbinado sugar or other raw, coarse sugar
- 1 1/2 teaspoon ground cinnamon
Instructions
- In a small bowl, stir the espresso powder into the hot water until it is dissolved. Set aside.
- In a big bowl, beat together the butter and shortening. Add both sugars, cinnamon, baking powder, nutmeg, baking soda, salt, and cloves. Follow up with the eggs, vanilla, and liquid espresso. Beat in the flour until just incorporated. Wrap dough in plastic wrap and chill at least 2 hours; otherwise, the dough will be very sticky and hard to work with.
- Preheat oven at 325-degrees. In a small bowl, stir together the topping ingredients.
- Use a tablespoon scoop to form dough into an round ball. Roll in cinnamon-sugar. Place rounds spaced-out on cookie sheet, flattening each to a fat disc.
- Bake for about 10 to 12 minutes. Let set on cookie sheet another 10 minutes before moving them to a cooling rack. Completely cool, then place in a sealed container at room temperature.
OM NOM NOM!
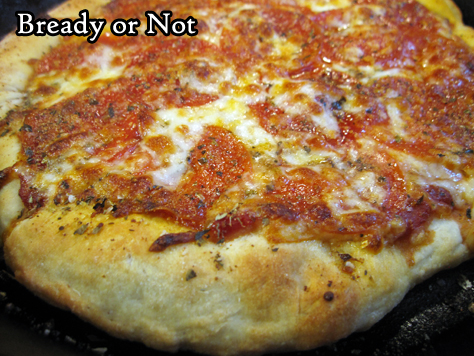
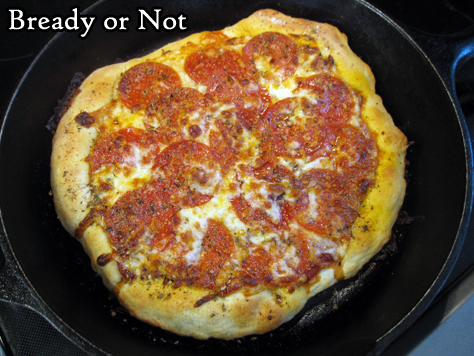
Bready or Not: 5 Minute Artisan Pizza Dough and Cast Iron Pan Pizzas
Today’s Bready or Not is a 2-for-1 deal: a recipe for fast and easy pizza dough, followed by the process I use for divvying up that dough to make small but thick cast iron pan pizzas.

The basic dough recipe is modified from the great book Artisan Bread in 5 Minutes a Day. [Affiliate link] Yes, this dough really comes together in 5 minutes. It also keeps for up to 2 weeks AND can be frozen.
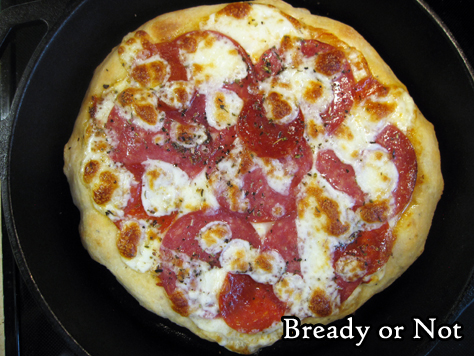
The method for making mini pizzas in a skillet is one I practiced a few times several years ago, then made a LOT during 2020 as my husband was working from home more often. I perfected it to the point where I had to write it down–and share here.
The pan pizza recipe is pretty much an outline to show the timing on the shaping, rise, and crust-cooking, but the ingredients are all up to you!
Bready or Not: 5 Minute Artisan Pizza Dough
Ingredients
- 1 1/3 cups warm water
- 2 Tablespoons olive oil
- 1/2 Tablespoon white sugar
- 3 1/4 cups all-purpose flour
- 3/4 Tablespoon kosher salt
- 2 teaspoons pizza seasoning or Italian seasoning, optional
- 2 1/4 teaspoons active yeast or one packet store-bought active yeast
Instructions
- Place the water, olive oil, and sugar in a big mixing bowl, stand mixer, or food processor. Add the flour, salt, and seasoning, if using. Start mixing together, then sprinkle in the yeast. Mix until just combined.
- Keep in same bowl, if desired, or transfer to another bowl that is greased. Loosely cover top with plastic wrap or towel and let dough rise at room temperature until it flattens out on top, about two hours.
- Dough can be used now but is much easier to handle when cold. Refrigerate in a non-airtight container and use within two weeks. Dough can also be frozen in freezer bags, for up to a month, and defrosted later in the fridge.
OM NOM NOM!
Bready or Not Original: Cast Iron Pan Pizzas
Equipment
- 10-inch cast iron skillet
Ingredients
- handful pizza dough
- olive oil
- desired toppings and seasonings
Instructions
- Preheat oven at 450-degrees. Add about a tablespoon of olive oil to a cast iron skillet and place the pan in the oven to heat up.
- Grab a good handful of pizza dough, or as much as desired to bake today. Oil a small space of counter or table as well as hands, and gently stretch and press out the dough to a rough circle. If it tears, patch with other pieces of dough as best possible. Let dough rest for about 20 minutes.
- By this time, the oven should have preheated. Use a potholder to pull out the skillet. Carefully swirl the hot oil in the pan to coat the bottom and set pan down on a safe surface. Carefully, again, place the dough in the pan.
- Bake crust for 6 to 10 minutes, until it is set. Pull out of oven and add desired toppings.
- Put pizza in oven for another 6 to 10 minutes, until crust is golden and toppings are cooked to desired level. Let pizza cool for about 10 minutes, then slide onto a plate or other surface to slice and eat.
- OM NOM NOM!
