


Bready or Not Original: Apple-Almond Olive Oil Cake
This Apple-Almond Cake is an absolute showstopper of a cake, and it’s not difficult to make!
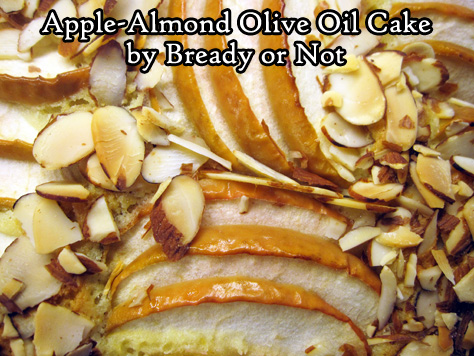
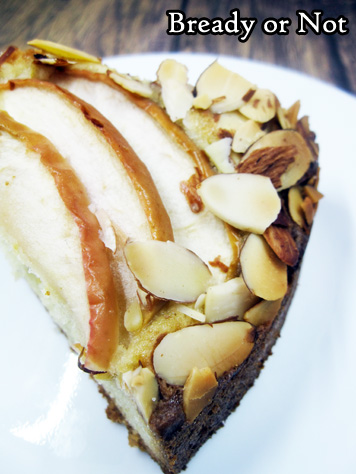
Really, I found cutting the apple into thin, mostly-equal pieces and placing them on the cake to be the most piddly part of the whole process. However, it was all well worth the effort!
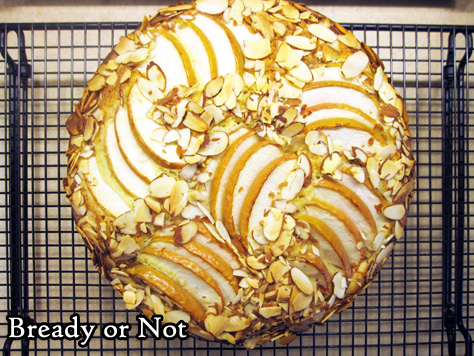
The taste of the cake isn’t super-sweet. The cake really tastes of lemon and almond, a fabulous pairing, with the apple providing a touch of flavor and sweetness.
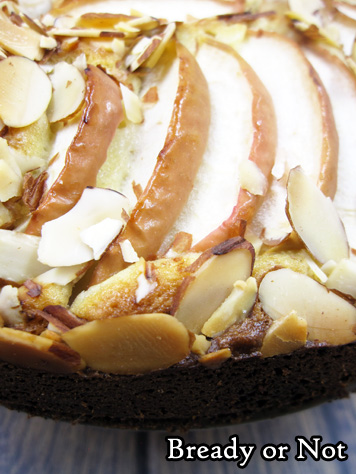
It’s not a thick or heavy cake, either. This would be fantastic to serve for a breakfast, brunch, or dessert–it can really do all the things!

I modified this recipe greatly from one that was in Bake from Scratch’s September-October 2020 issue, which used a pear instead of an apple. It’s a fantastic issue–you’ll see my takes on several other recipes in the future!
Bready or Not Original: Apple-Almond Olive Oil Cake
Equipment
- 9-inch springform pan
- parchment paper
Ingredients
- 2 large eggs room temperature
- 1 cup white sugar
- 1/2 cup extra-virgin olive oil
- 2/3 cup almond flour sifted to remove clumps
- 1/3 cup half & half or milk
- 1 lemon zested and juiced
- 1 teaspoon vanilla extract
- 1/4 teaspoon almond extract
- 1 1/3 cup all-purpose flour
- 1 1/2 teaspoons baking powder
- 3/4 teaspoon kosher salt
- 1 large Pink Lady apple or other firm baking apple
- 1/2 cup sliced almonds
Instructions
- Preheat oven at 350-degrees. Cut parchment paper to fit the bottom of a 9-inch springform pan. Apply nonstick spray to pan; place parchment round inside, then spray to coat that as well.
- In a stand mixer with a whisk attachment. whip the eggs at high speed until they are foamy, about a minute. Reduce the speed to medium to add the white sugar. Continue to beat until it becomes thick and pale, about 2 minutes.
- With the mixer going, pour in olive oil. Pause to scrape sides of bowl. Add the almond flour, half & half, all of the lemon zest, and both extracts, mixing until combined.
- In another bowl, stir together flour, baking powder, and salt. Fold the dry ingredients into the moist mix. Pour batter into the prepared pan.
- Prep the apple. Core it, leaving the peel intact. Cut into thin slices of equal size. Pour reserved lemon juice over the apples, tossing them to coat.
- Place apple slices on top of batter in fanned-out groups of about five, having them face different angles all around the top. NOTE: as the batter is very sticky, the apples will be nigh impossible to move after they are placed, so make careful decisions. Sprinkle the sliced almonds around the edges and in the gaps between the apples.
- Bake for about 50 minutes, until the middle passes the toothpick test. Set on rack for 15 minutes before removing the ring from the pan. Serve warm, or cool completely, keeping the cake on the round base. When slicing the cake, be aware that the peel is pretty but may resist the blade–it’s easier to snip through with a pair of kitchen shears.
- Cake can be sliced and frozen for later, but it will taste best at room temperature or warmed.
OM NOM NOM!
Bready or Not: Gingerbread Chocolate Chip Cookies
Let’s start the year right with these Gingerbread Chocolate Chip Cookies!
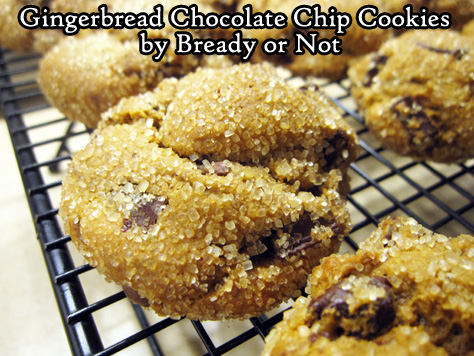
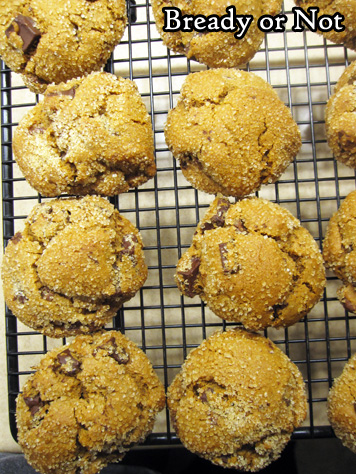
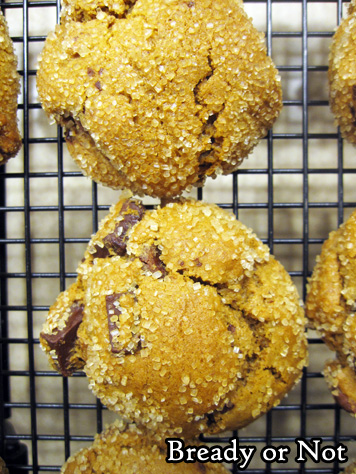
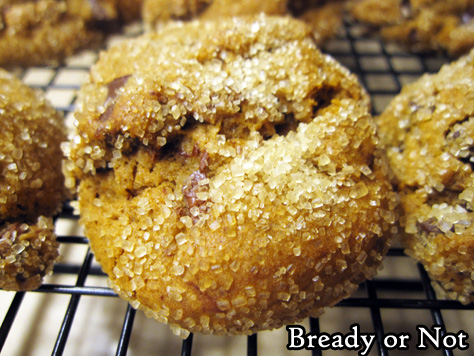
These things are soft and chewy, the coarse sugar providing a sweet, crunchy crust. Plus, you get chocolate mixed throughout, which provides a lovely contrast to the spicy gingerbread.
I’ve noticed that it’s a very British thing to do at least part of a gingerbread recipe on the stovetop. It definitely creates a different, richer flavor that the standard American recipe that mixes everything in a bowl.
You’ll notice this recipe includes a lot of fresh ginger. In the past, I’ve kept ‘fresh’ ginger around by buying a hunk, using a vegetable peeler to take off the outside, then freezing the interior in pieces. You can then grate it straight from the freezer. I think I learned about this technique from a food magazine ages ago.
The original of this recipe is from a food magazine, too–Bake from Scratch Holiday Cookies 2019, this recipe by Edd Kimber. My version is modified a great deal. I do recommend seeking out this issue, though, as it has a LOT of great recipes.
Bready or Not: Gingerbread Chocolate Chip Cookies
Equipment
- large saucepan
- tablespoon scoop
- parchment paper
Ingredients
- 1 cup light brown sugar packed
- 1 cup unsalted butter 2 sticks, softened
- 1/2 cup unsulphured molasses
- 2 large eggs room temperature
- 4 cups all-purpose flour
- 2 Tablespoons fresh ginger
- 2 teaspoons baking soda
- 1 teaspoon baking powder
- 2 teaspoons ground cinnamon
- 1 teaspoon ground ginger
- 1/2 teaspoon kosher salt
- 1/4 teaspoon ground nutmeg
- 10.5 ounces chocolate chips dark, semisweet, or a mix
- 3/4 cup turbinado sugar
Instructions
- In a large saucepan on medium-heat, stir together brown sugar, butter, and molasses until the butter is melted and everything is mixed. Remove from heat to cool for 30 minutes.
- Whisk eggs into the cooled mixture.
- In a big bowl, combined flour, fresh ginger, baking soda, baking powder, cinnamon, ground ginger, salt, and nutmeg. Pour in the sugar from the saucepan, stirring until just combined. Fold in the chocolate.
- Encase dough in plastic wrap and refrigerate for at least 2 hours.
- Pull out dough to soften slightly, about 10 or 15 minutes. Preheat oven at 375-degrees. Line a large baking sheet with parchment paper.
- Measure out the turbinado sugar into a small bowl. Use a tablespoon scoop to dole our dough, rolling each ball in sugar before setting spaced-out on baking sheet.
- Bake for 12 to 14 minutes, until cookies are set. Cool on pan for 5 minutes before transferring them to a cooling rack.
- Store in an airtight container at room temperature. Cookies keep for at least 3 days.
OM NOM NOM!
End of 2021 Publication Round-Up
2021 is finally at end. Surely 2022 must be better. Right? RIGHT?
The end of the year brought a flood of new publications. These have also been added to my complete Short Works Bibliography.
Short stories
- “A Consideration of Trees,” Escape Pod (text as well as podcast)
- “Welcome Home,” Nature (Nov 17 2021)
Poetry
- “The Bookstore,” NewMyths.com
- “Follow the Meandering Path,” Abyss & Apex Issue 80: 4th Quarter 2021
- “Shapeshifting Isn’t Some Party Trick,” Daikaijuzine
- “The Eye of the Kraken,” Eye to the Telescope Issue 42: The Sea
- “Field Trip to See the Mermaid,” Mermaids Monthly
- “Demons,” Star*Line 44.4 Winter 2021
#SFWAPro
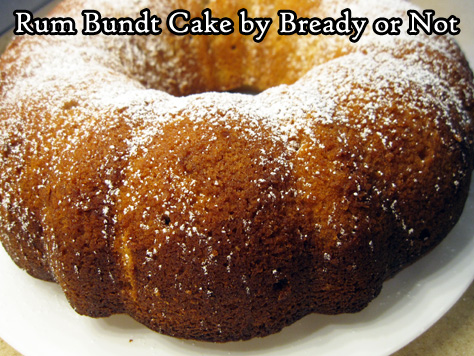
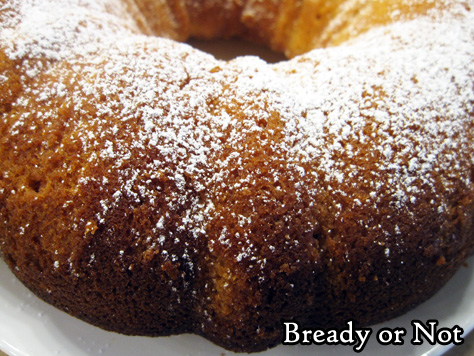
Read MoreBready or Not Original: Rum Bundt Cake
This Rum Bundt Cake is luscious–soft and moist, with rum baked-in and soaked-in. It’s perfect for an indulgent New Year’s Eve treat, or make it any time of year!
The most basic form of this recipe came to me on a postcard sent by my mother-in-law’s husband. He travels a lot, and sent me a card from the Virgin Islands that included a rum bundt cake recipe on the front.
The thing was, the recipe was squeezed into limited space and quite basic. The baking temperature was low and strange, too–no way was an enriched bundt cake baking at 300-degrees in 45 minutes.
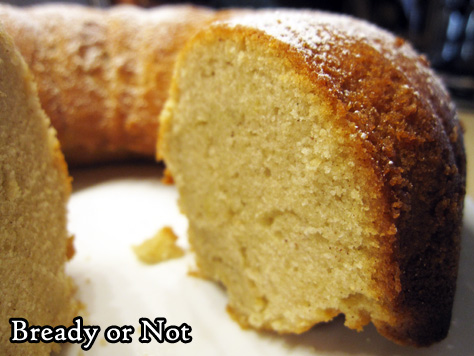
So, I rewrote the recipe. I also added more rum. I used the return-to-pan soaking method I learned from Bake Off years ago to make sure this baby was really rummy. That liquid gold shouldn’t drip off. No, it needs to be used to bathe a cake.
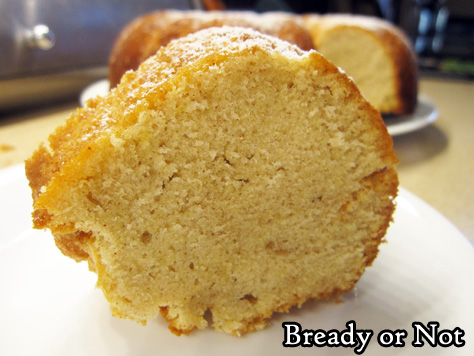
The end result is fragrant with rum. The outside is crisp while the crumb is tender and moist without being soggy. It’s not a super-sweet cake, either, but it is definitely lush.
Modified greatly from a souvenir postcard.
Bready or Not Original: Rum Bundt Cake
Equipment
- large bundt pan
- pastry brush
- chopstick
Ingredients
Cake
- 1 cup unsalted butter 2 sticks, room temperature
- 2 cups white sugar
- 6 large eggs room temperature
- 2 cups all-purpose flour
- 1 teaspoon cinnamon
- 2 teaspoons vanilla extract
- pinch salt
- 1/4 cup rum
Rum soak:
- 1/4 cup rum divided
- confectioners’ sugar
Instructions
- Preheat oven at 350-degrees. Heavily grease or use nonstick spray in a large bundt pan.
- In a mixer, blend together butter and sugar. Add eggs one at a time. Follow up with the flour, cinnamon, vanilla, salt, and rum.
- Pour batter into pan. Bake for about 45 minutes, until the middle passes the toothpick test. Let cool for about 20 minutes, then invert cake onto a cooling rack. Don’t wash the pan!
- After the cake is completely cool, tip it back into the pan. Stab the top (the future base) all over with a chopstick or similar tool. Drizzle 2 Tablespoons of rum over the surface. Let it sit a few minutes. Invert the cake onto a plate. Again, stab the surface all over with something like a chopstick. Brush the remaining 2 Tablespoons rum over the top and sides, mopping up any droplets to brush on again. Let set a few minutes.
- Before serving, sprinkle on confectioners’ sugar. Slice and enjoy! Keep covered in fridge or at room temperature. Cake can be frozen in individual slices for later enjoyment, too.
OM NOM NOM!
Bready or Not: Peppermint Bark Cookies
These incredible Peppermint Bark cookies really do taste like peppermint bark, but in chewy, beautiful cookie form!
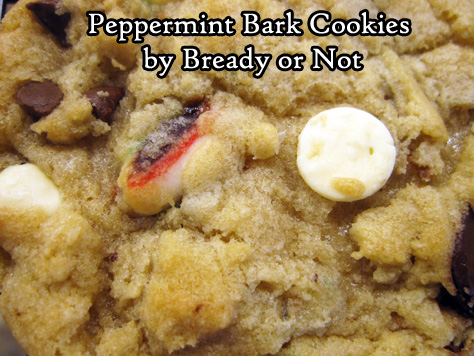
These cookies even look holiday-colorful due to the bits of crushed candy cane throughout. I used a Hershey’s Chocolate Mint Candy Cane, but many varieties of candy cane would do. You could even mix it up with different colors and flavors!
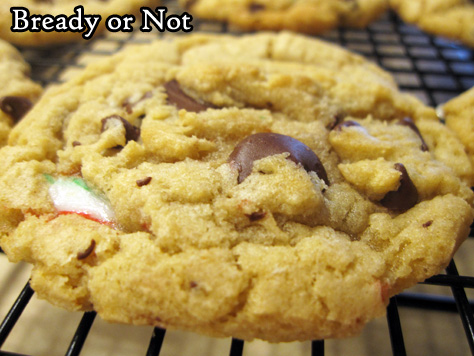
I kept things easier by using chocolate chips, but this would be great with chopped chocolate, too, for different textures and flavors. Peppermint Bark itself comes in different variants, after all!

These cookies would be fantastic for a holiday cookie exchange, or to serve at a gathering. Or, if you’re cheap like me, bake them later on in January using candy canes scored on clearance!

Modified from Bake from Scratch Magazine Holiday Cookies 2019.
Bready or Not: Peppermint Bark Cookies
Equipment
- tablespoon scoop
- parchment paper
Ingredients
- 1 1/2 cups light brown sugar packed
- 1 cup unsalted butter 2 sticks, melted
- 1/2 cup white sugar
- 2 large eggs room temperature
- 1 teaspoon vanilla extract
- 1 teaspoon peppermint extract
- 3 1/2 cups all-purpose flour
- 1 teaspoon baking soda
- 1 teaspoon fine sea salt
- 4 ounces white chocolate chips
- 4 ounces dark chocolate chips
- 4 peppermint candy canes crushed
Instructions
- In a mixer, beat brown sugar, butter, and white sugar until combined. Add eggs one at a time followed by the extracts.
- In a separate bowl, stir together flour, baking soda, and sea salt. Gradually add the dry ingredients into the butter mixture. Fold in the two chocolates and candy cane bits. Cover top of dough with plastic wrap and chill it for 15 minutes.
- Preheat oven at 350-degrees. Line a large baking sheet with parchment paper.
- Use a tablespoon scoop to parcel out dough, spaced out, on baking sheet. Bake for 10 to 12 minutes, until cookies are set and just turning golden. Keep on sheet for a few minutes then transfer to a cooling rack.
- Store cookies in seal containers at room temperature. Keeps for at least 3 days.
