


Bready or Not Original: Comte Pull-Apart Rolls
Bread is awesome. Cheese is awesome. Combine them to achieve a special kind of awesome, especially in the case of these Comte Pull-Apart Rolls.
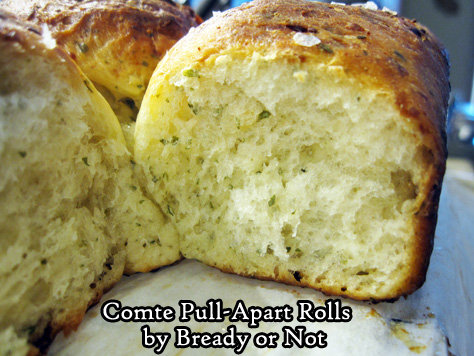
These rolls are tender, soft, and inherently savory. They are perfect to go along with roasts.
First of all, the cheese. If you live in a cheese-deprived area as I do, Comte may not be available (or is only available at Christmas, sigh) or is prohibitively expensive. Really, you can use any cheese you like here, but I advise using one with a savory note. Another alpine cheese or a bandage-wrapped cheddar would do the trick.

My recipe is based on one featured in the Nov/Dec 2018 issue of Bake from Scratch. I made significant modifications, the foremost being that I halved the recipe so that it would only produce 12 rolls.
This recipe isn’t as fussy as some homemade rolls, but it still takes some time and effort. I was very worried because my first rise was so low, but my rolls rose beautifully once they were formed. That’s the rise that really matters!
If you want to give your second rise a boost, use this trick: preheat your oven at 200-degrees. Shape your rolls or bread. Stick the dough in the oven without any plastic wrap or cover. Immediately turn the oven OFF. Set a timer for 30 to 40 minutes or longer; this will depend on the oven, so experiment. Once the bread has nicely puffed from the heat, remove it from the oven, then preheat it again for the full bake.
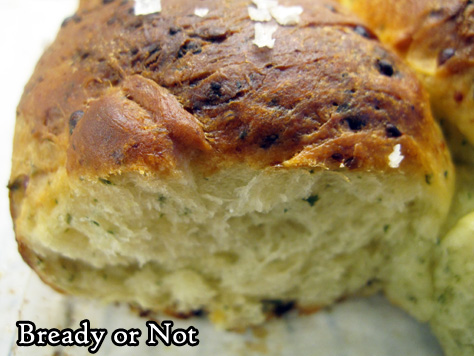
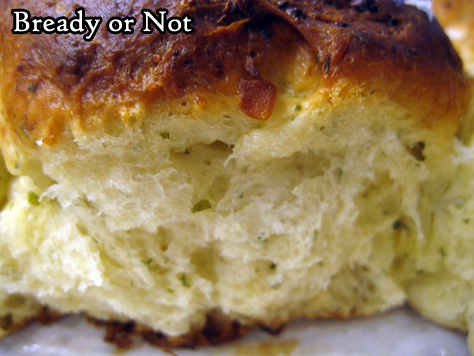
These rolls can be eaten at room temperature or warm, but for me, they really are far better hot. I want them to melt butter!
Bready or Not Original: Comte Pull-Apart Rolls
Equipment
- 9×9 pan
- parchment paper
- kitchen scale
- pastry brush
Ingredients
- 1/2 cup warm milk (105-110 degrees F), can substitute half & half
- 1/2 cup warm water (105-110 degrees F)
- 1/2 Tablespoon active dry yeast
- 1 large egg room temperature
- 2 Tablespoons white sugar
- 1/4 cup unsalted butter melted and divided
- 1/2 Tablespoon kosher salt
- 2 3/4 cup bread flour
- 2 Tablespoons dried parsley or other dried herbs
- 4 ounces grated Comte cheese 100 grams
- flaked salt for garnish, optional
Instructions
- In a stand mixer, place the warm liquids and yeast. Let stand for about 10 minutes, until the yeast is nice and foamy. Add the eggs, sugar, 2 Tablespoons of melted butter, and salt. Gradually beat in the flour, cheese, and parsley, until everything is well combined.
- Cover the bowl to let the dough rise for about an hour.
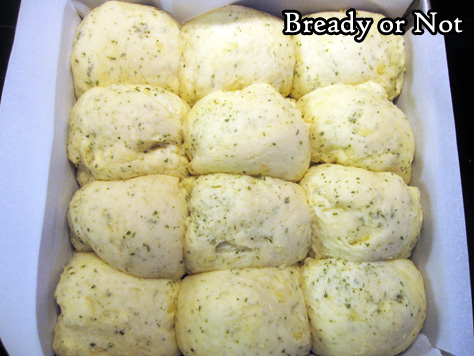
- Line a 9×9 pan with parchment paper cut to crisscross and extend up all four sides. Apply nonstick spray.
- Lightly flour a surface. Turn out the dough onto it. Use the kitchen scale to weigh the dough. Divide it into 12 equal portions, forming each into a tidy ball. Place in rows within the prepared pan, each roll touching. Cover the pan to let rolls rise for another 40 minutes to an hour.
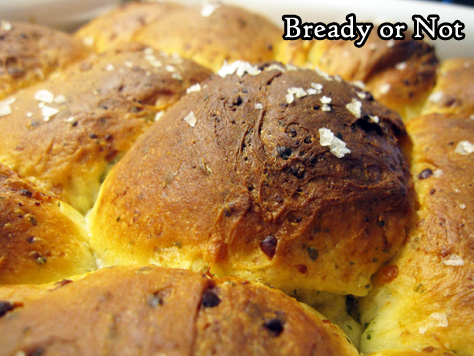
- Preheat oven at 375-degrees. Brush rolls with remaining 2 Tablespoons butter and add a sprinkle of flaked salt, if desired.
- Bake rolls for 13 minutes. Check them. If they are getting quite brown, cover the pan with foil. Bake for another 13 to 15 minutes.
- Serve rolls at room temperature or warm.
OM NOM NOM!
Bready or Not: Brookies
No need to deliberate whether to make chocolate chip cookies or brownies–this recipe for Brookies combines these goodies together in a delicious way.
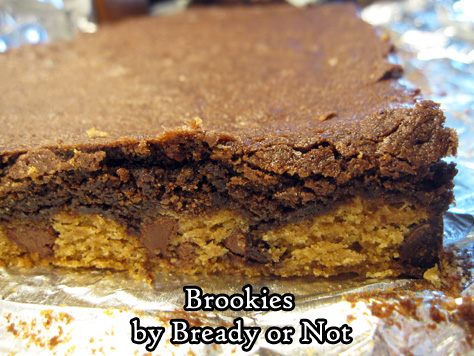
This recipe excels at chocolate distribution. It’s not super-chocolaty, but every bite has some brownie and chocolate chips. If you add in cacao nibs, it’s even better; the nibs enhance the other chocolate flavors and adds a pleasant crunch at the same time.
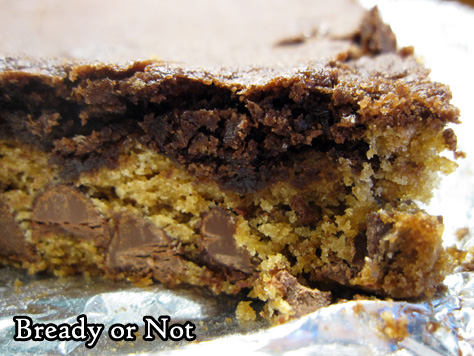
On that note, this is a great recipe for people who don’t like nuts. There’s lots of flavor here without them. Could you add nuts? Sure. Is it necessary? Nope.
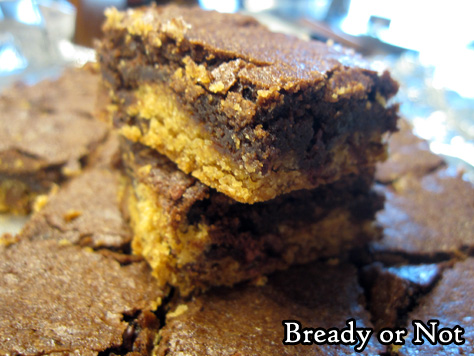
These bars are dense and nicely portable. Wrap them up individually, and they are great for a school lunch, road trip, or picnic. Plus, they freeze well, so you can even save some for later!
Modified from AllRecipes Magazine August/September 2020.
Bready or Not: Brookies
Equipment
- 9×13 pan
Ingredients
Cookie layer
- 1/2 cup unsalted butter (1 stick) room temperature
- 1/2 cup light brown sugar packed
- 1/4 cup white sugar
- 1/2 teaspoon vanilla extract
- 1 large egg room temperature
- 1 1/4 cups all-purpose flour
- 1/2 teaspoon salt
- 1/2 teaspoon baking soda
- 1 cup semisweet chocolate chips
Brownie layer
- 1/2 cup unsalted butter (1 stick) melted
- 1 cup white sugar
- 1 teaspoon vanilla extract
- 2 large eggs
- 1/3 cup cocoa powder sifted
- 1/2 cup all-purpose flour
- 1/4 teaspoon baking powder
- 1/8 teaspoon salt
- 1/4 cup cacao nibs optional
Instructions
Make cookie layer
- Preheat oven at 350-degrees. Line a 9×13 pan with aluminum foil and apply nonstick spray.
- In a large bowl, beat together butter, sugars, and vanilla until light and creamy. Add egg, scraping bottom of bowl, then beat another two minutes.
- In another bowl, combine flour, salt, and baking soda. Gradually mix the dry ingredients into the wet. Fold in chocolate chips. Dough will be very thick and sticky. Drop into pan in clumps and press into a level layer, covering the bottom completely.
Make brownie layer
- Using the same big bowl (leave it unwashed or wash it, baker’s preference), beat together butter, sugar, and vanilla. Follow with the egg. Stir in the cocoa powder, flour, baking powder, and salt. Fold in the cacao nibs, if using.
- Pour over the cookie layer, spreading it into an even layer.
- Bake until the middle passes the toothpick test, 20 to 25 minutes. Cool completely–chilling in fridge, if desired–before slicing into bars.
- Brookies will keep in a sealed container at room temperature for 3 days, and can also be frozen for layer enjoyment.
OM NOM NOM!
Bready or Not: Sally Lunn Bread in a Bundt Cake Pan
When I had the opportunity to visit the city of Bath in England in 2019, I knew the absolutely necessary stop for lunch was Sally Lunn Eating House, known for centuries for the Sally Lunn bun. I first learned of it from a history spot on the Great British Bake Off.
The bun has some mystery and history to it, but what is certain is that it is rather brioche-like and delicious. Upon coming home, I set about trying several recipes for a homemade version. The results were meh–until this one, which is odd because this bread is also very different.
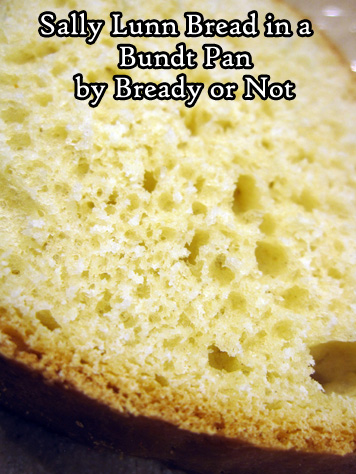
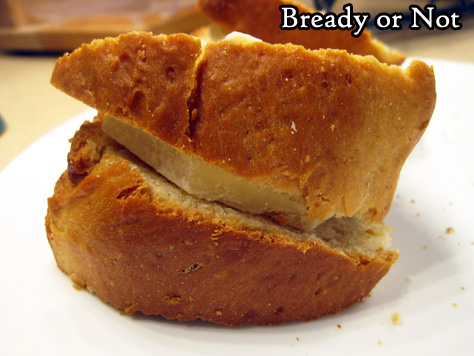
The true Sally Lunn bun is a bun, made in a specialized bun mold. This recipe makes an enriched bread, mixed in a food processor, and risen and baked in a bundt pan. The result is a lush, sweet bread. The flavor and feel is right, even if the shape is radically different.

Though it has a browned crust, the bread itself is still somewhat delicate. It requires thick slices, which isn’t a bad thing at all, because it’s so soft and delicious.
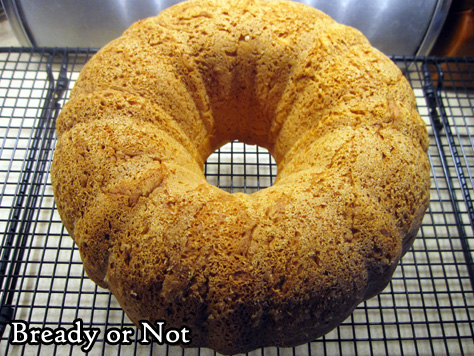
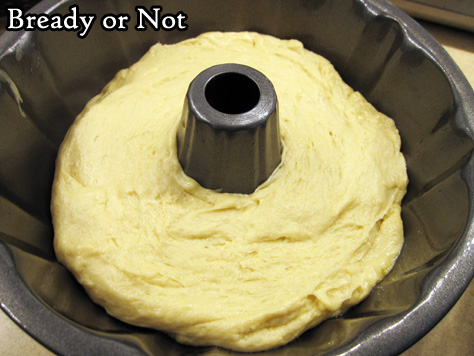
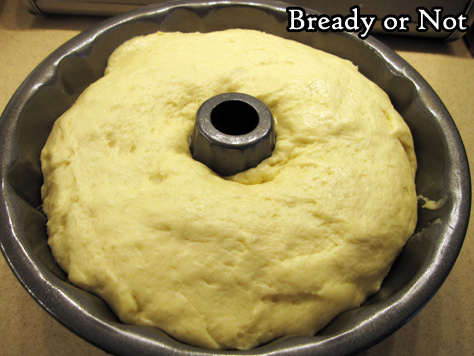
I don’t often share process photos on Bready or Not, but I think for this recipe, they will help. First of all, here’s what the bread looked like with the batter just placed in the bundt pan.
Here it is after the second rise!
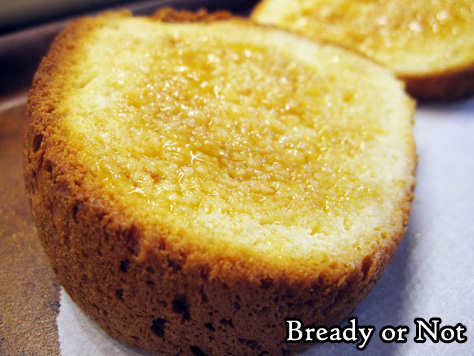
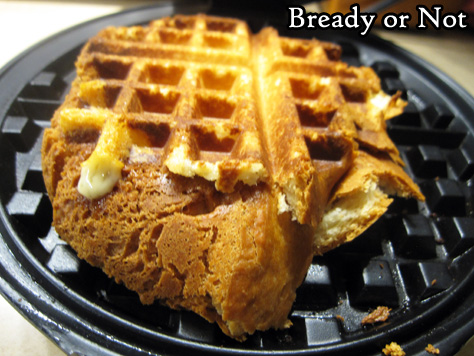
We found that the bread needed to be eaten hot, with toasted being the best. Since the pan made a big loaf–18 thick slices–I had plenty of bread to experiment with. I hit on the idea of using it for grilled cheese sandwiches using the waffle iron. This is THE BEST way to make grilled cheese, by the way.
This shot shows how thick the bread was. I was still able to compress it in the waffle iron just fine, where in a matter of minutes, I created a no-fuss crispy, buttery masterpiece.
Bready or Not: Sally Lunn Bread in a Bundt Cake Pan
Equipment
- large food processor
- large bundt pan
Ingredients
- 1/2 cup milk
- 1/2 cup water
- 3 1/2 to 4 cups all-purpose flour
- 1/3 cup white sugar
- 1 teaspoon salt
- 2 1/4 teaspoon instant yeast
- 1/2 cup unsalted butter 1 stick, room temperature
- 3 large eggs room temperature
Instructions
- Warm the milk and water together, by microwave or stovetop, to about 100-degrees.
- Fit a plastic dough blade inside the food processor. Add 2 cups flour, the sugar, salt, and yeast. Pulse a few times. Add the milk-water, butter, and eggs, and pulse more. Add 1/2 cup more flour. Pulse again. Add the rest of the flour, pulsing until the dough becomes stiff.
- Cover mixer bowl with lid or plastic wrap and let dough rise at room temperature for about an hour. It should double.
- Remove plastic wrap, if using, and affix lid. Pulse a few times to beat down again–but be warned, the dough is so thick, the processor might jump around. Stay right there. The dough only needs a few seconds of pulses.
- Thoroughly grease the bundt pan. Pour in the batter and smooth it out to an even level. Cover pan with plastic wrap or a towel and let the dough rise until it has doubled again, about 50 minutes.
- Preheat oven at 325-degrees.
- Bake for 50 minutes. The loaf should look golden brown on top, and a digital thermometer plunged into the middle of the bread should read at least 190-degrees.
- Let loaf cool in pan about 20 minutes, then invert onto a rack to cool more. The bread is fragile to cut and requires thick slices. This Sally Lunn loaf is best eaten warm, especially toasted. It can also be cut into individual slices and frozen for later enjoyment.
OM NOM NOM!
Bready or Not: Cheddar Bay Biscuits
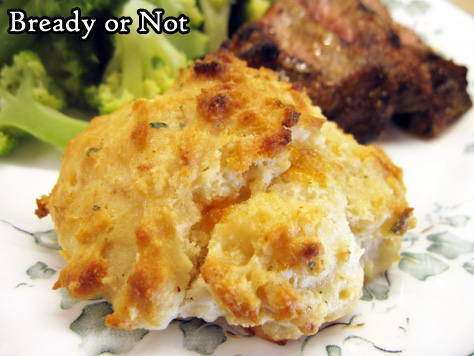
Let’s state a truth up front: a visit to Red Lobster isn’t about the seafood. It’s about those Cheddar Bay Biscuits they bring out as an appetizer.

I’ve used this recipe for about 10 years now. I posted it on my LiveJournal in the earlier iteration of Bready or Not, but now it’s time to share again with new photos and an easy-to-print format.

These biscuits are incredible. Cheesy, crisp, tender. Buttery. I mean, you baste them in butter and seasonings for the final step. You know they will be good.

Plus, these keep well in the fridge for days! In a pinch, you can heat them in the microwave, but they are far better warmed in an oven or toaster oven. That way the outside stays crisp and the interior texture stays just right.
I bet if you give these a try, they’ll be a reliable side dish bread in your recipe repertoire, too!
Bready or Not: Cheddar Bay Biscuits
Equipment
- parchment paper
- pastry brush
Ingredients
Biscuits
- 2 cups all-purpose flour
- 2 teaspoons baking powder
- 1/2 teaspoon baking soda
- 1 teaspoon white sugar
- 1/2 teaspoon garlic powder
- 1/4 teaspoon cayenne pepper
- 6 ounces sharp cheddar cheese shredded
- 1 cup buttermilk or soured milk*
- 1/2 cup unsalted butter 1 stick, melted and cooled
Topping
- 3 Tablespoons unsalted butter melted
- 1/2 teaspoon garlic powder
- 1/4 teaspoon dried parsley
Instructions
- Preheat oven at 475-degrees. Line a big baking sheet with parchment.
- In a big bowl, combine the flour, baking powder, baking soda, sugar, salt, garlic powder, and cayenne. Fold in the cheddar cheese.
- Fold the buttermilk into the dry ingredients, followed by the melted butter, scraping the bottom of the bowl well to make sure everything is mixed in. Grease a 1/3 cup and use that to scoop up portions of dough to place spaced out on the baking sheet.
- As the biscuits bake for 11 to 13 minutes, until golden brown, prepare the topping. Melt the butter and stir in the garlic powder and parsley. As soon as the biscuits are out of the oven, brush on the topping to cover the nooks and crannies of every biscuit on the pan.
- Eat right away. Leftovers will keep in a sealed container in the fridge for days. They can be microwaved, but are best warmed in an oven or toaster oven.
OM NOM NOM!
Notes
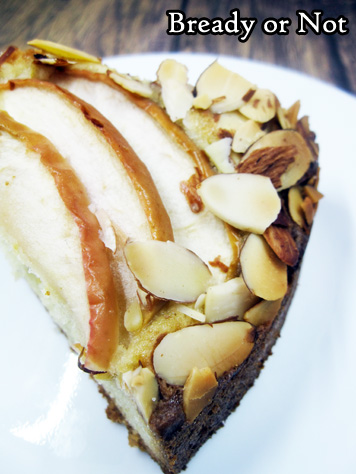
Bready or Not Original: Apple-Almond Olive Oil Cake
This Apple-Almond Cake is an absolute showstopper of a cake, and it’s not difficult to make!
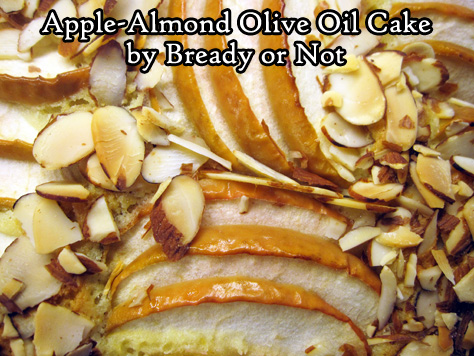
Really, I found cutting the apple into thin, mostly-equal pieces and placing them on the cake to be the most piddly part of the whole process. However, it was all well worth the effort!
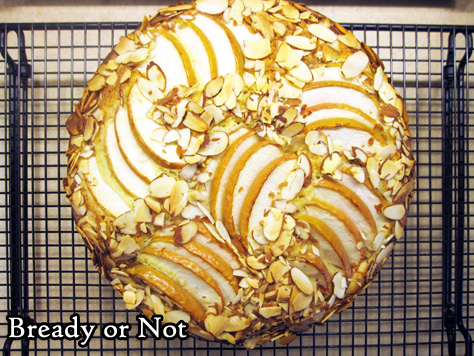
The taste of the cake isn’t super-sweet. The cake really tastes of lemon and almond, a fabulous pairing, with the apple providing a touch of flavor and sweetness.
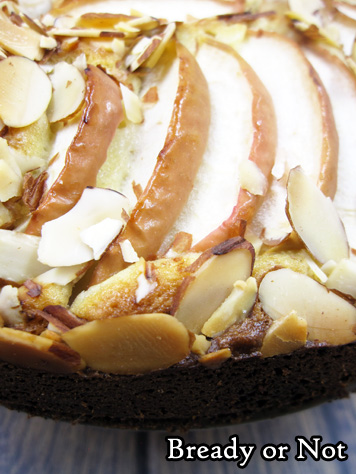
It’s not a thick or heavy cake, either. This would be fantastic to serve for a breakfast, brunch, or dessert–it can really do all the things!

I modified this recipe greatly from one that was in Bake from Scratch’s September-October 2020 issue, which used a pear instead of an apple. It’s a fantastic issue–you’ll see my takes on several other recipes in the future!
Bready or Not Original: Apple-Almond Olive Oil Cake
Equipment
- 9-inch springform pan
- parchment paper
Ingredients
- 2 large eggs room temperature
- 1 cup white sugar
- 1/2 cup extra-virgin olive oil
- 2/3 cup almond flour sifted to remove clumps
- 1/3 cup half & half or milk
- 1 lemon zested and juiced
- 1 teaspoon vanilla extract
- 1/4 teaspoon almond extract
- 1 1/3 cup all-purpose flour
- 1 1/2 teaspoons baking powder
- 3/4 teaspoon kosher salt
- 1 large Pink Lady apple or other firm baking apple
- 1/2 cup sliced almonds
Instructions
- Preheat oven at 350-degrees. Cut parchment paper to fit the bottom of a 9-inch springform pan. Apply nonstick spray to pan; place parchment round inside, then spray to coat that as well.
- In a stand mixer with a whisk attachment. whip the eggs at high speed until they are foamy, about a minute. Reduce the speed to medium to add the white sugar. Continue to beat until it becomes thick and pale, about 2 minutes.
- With the mixer going, pour in olive oil. Pause to scrape sides of bowl. Add the almond flour, half & half, all of the lemon zest, and both extracts, mixing until combined.
- In another bowl, stir together flour, baking powder, and salt. Fold the dry ingredients into the moist mix. Pour batter into the prepared pan.
- Prep the apple. Core it, leaving the peel intact. Cut into thin slices of equal size. Pour reserved lemon juice over the apples, tossing them to coat.
- Place apple slices on top of batter in fanned-out groups of about five, having them face different angles all around the top. NOTE: as the batter is very sticky, the apples will be nigh impossible to move after they are placed, so make careful decisions. Sprinkle the sliced almonds around the edges and in the gaps between the apples.
- Bake for about 50 minutes, until the middle passes the toothpick test. Set on rack for 15 minutes before removing the ring from the pan. Serve warm, or cool completely, keeping the cake on the round base. When slicing the cake, be aware that the peel is pretty but may resist the blade–it’s easier to snip through with a pair of kitchen shears.
- Cake can be sliced and frozen for later, but it will taste best at room temperature or warmed.
